There’s something absolutely magical about the moment you present a Baked Alaska at the dinner table. The dramatic contrast of cold ice cream nestled beneath a cloud of golden, torched meringue never fails to elicit gasps of delight from my guests. When I first attempted this classic dessert, I’ll admit I was intimidated by its reputation as a challenging recipe. However, after perfecting my technique over countless attempts, I’ve discovered that creating a stunning Vanilla-Raspberry Baked Alaska is far more achievable than most home bakers realize.
This magnificent dessert combines three distinct elements that work in perfect harmony: a tender cake base, creamy vanilla ice cream studded with vibrant raspberries, and a billowy meringue topping that’s torched to perfection. The beauty of this dessert lies not only in its impressive presentation but also in the delightful temperature contrast that surprises your palate with each spoonful.
Understanding the Components
Before diving into the recipe, let me break down the essential elements that make this dessert extraordinary:
Cake Base : A thin layer of sponge cake or pound cake that provides structural support and absorbs any melting ice cream, preventing a soggy mess.
Ice Cream Layer : The heart of the dessert, featuring vanilla ice cream mixed with fresh raspberries for bursts of tart sweetness.
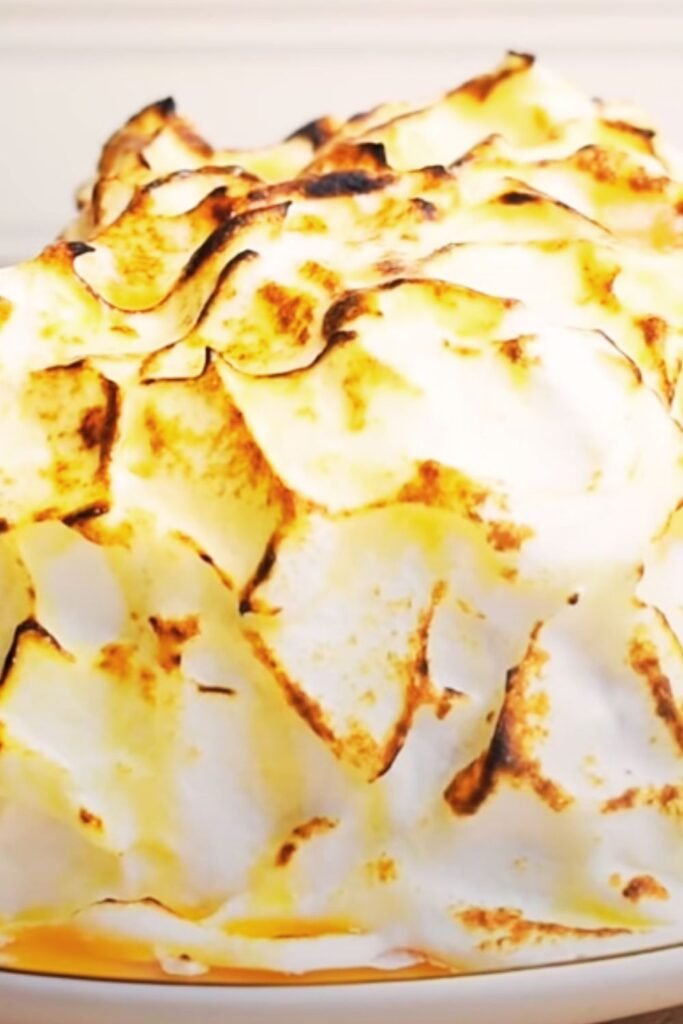
Meringue Topping : A protective and decorative layer made from whipped egg whites and sugar that insulates the ice cream while browning beautifully under heat.
Torching Technique : The final step that transforms the pale meringue into golden peaks, creating the signature appearance of this classic dessert.
Essential Equipment and Ingredients
Creating the perfect Baked Alaska requires specific tools and high-quality ingredients. I’ve learned through experience that having everything prepared beforehand makes the assembly process much smoother.
Equipment Checklist
| Equipment | Purpose | Alternative Options |
|---|---|---|
| Stand Mixer | Whipping meringue to perfect peaks | Hand mixer (requires more time) |
| Kitchen Torch | Browning the meringue topping | Broiler (less control) |
| Ice Cream Scoop | Shaping uniform ice cream portions | Large spoon (less precise) |
| Offset Spatula | Spreading meringue smoothly | Regular spatula |
| Thermometer | Monitoring meringue temperature | Visual cues for doneness |
| Freezer-Safe Dome Mold | Shaping the ice cream | Large bowl lined with plastic wrap |
Ingredient Quality Matters
The success of your Baked Alaska heavily depends on ingredient quality. I always source the freshest raspberries I can find, preferably organic ones that haven’t been frozen. The vanilla ice cream should be premium quality with real vanilla bean specks visible throughout. For the meringue, room temperature egg whites whip to greater volume than cold ones, so I plan accordingly.
Step-by-Step Preparation Guide
Phase 1: Preparing the Ice Cream Base
I begin this process at least four hours before serving, though overnight preparation yields the best results. The ice cream needs to be soft enough to mix with raspberries but not completely melted.
- Remove your vanilla ice cream from the freezer and let it soften for 15-20 minutes
- Gently fold in fresh raspberries, being careful not to crush them completely
- Line your dome mold with plastic wrap, leaving overhang for easy removal
- Pack the raspberry-vanilla mixture into the mold, pressing firmly to eliminate air pockets
- Cover tightly and freeze for at least 3 hours until completely solid
Phase 2: Cake Base Preparation
While the ice cream firms up, I prepare the cake base. You can use store-bought pound cake, but I prefer making a simple sponge cake for better texture control.
Simple Sponge Cake Recipe:
- 3 large eggs, separated
- 1/3 cup granulated sugar
- 1/3 cup all-purpose flour
- 1/4 teaspoon vanilla extract
- Pinch of salt
The key to a perfect sponge cake lies in properly whipping the egg whites and folding them gently into the batter. I whip the whites to soft peaks, then gradually add sugar until stiff peaks form. The yolks get mixed with vanilla, then I alternate folding in the flour and egg whites in three additions.
Phase 3: Assembly Techniques
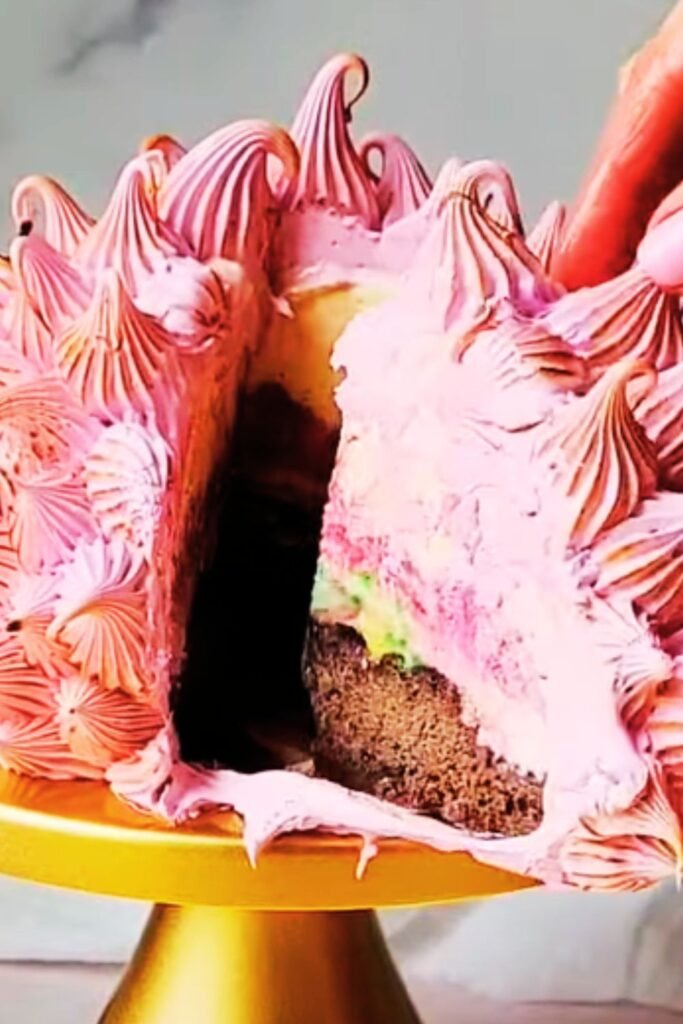
Assembly requires working quickly but deliberately. I remove the ice cream dome from the freezer just before starting the meringue preparation. The cake base should be cut to fit your serving plate with about an inch border around the ice cream dome.
Timing becomes crucial during assembly. I position the cake base on my serving plate, unmold the ice cream dome onto the center, then immediately begin applying the meringue while the ice cream is still frozen solid.
Mastering the Meringue
The meringue component often intimidates home bakers, but I’ve developed a foolproof technique that produces consistently excellent results. The secret lies in understanding the science behind meringue formation and controlling every variable.
Temperature Control Table
| Stage | Temperature | Visual Cues | Timing |
|---|---|---|---|
| Soft Peaks | Room temp eggs | Peaks fold over | 2-3 minutes |
| Medium Peaks | 100°F mixture | Peaks hold briefly | 4-5 minutes |
| Stiff Peaks | 120°F mixture | Peaks stand straight | 6-8 minutes |
| Italian Meringue | 160°F syrup | Glossy, stable | 10-12 minutes |
I prefer using the Italian meringue method for Baked Alaska because it creates a more stable foam that holds its shape longer. This technique involves gradually adding hot sugar syrup to whipping egg whites, which partially cooks the proteins and creates superior stability.
Italian Meringue Process:
- Combine 1/2 cup sugar with 2 tablespoons water in a small saucepan
- Heat to 240°F (soft ball stage) without stirring
- Meanwhile, whip 4 egg whites to soft peaks
- Slowly pour hot syrup into whites while mixing on medium speed
- Continue whipping until mixture cools and forms stiff, glossy peaks
Application Techniques
Applying meringue requires both speed and artistry. I use an offset spatula to spread a base layer completely covering the ice cream and cake, ensuring no gaps where cold air could escape. Then I create decorative peaks and swirls using upward motions with the spatula tip.
The key principle here involves creating sufficient insulation while maintaining visual appeal. I make sure the meringue layer is at least 1/2 inch thick everywhere, with higher peaks for dramatic effect. Any thin spots will allow heat to penetrate and melt the ice cream during torching.
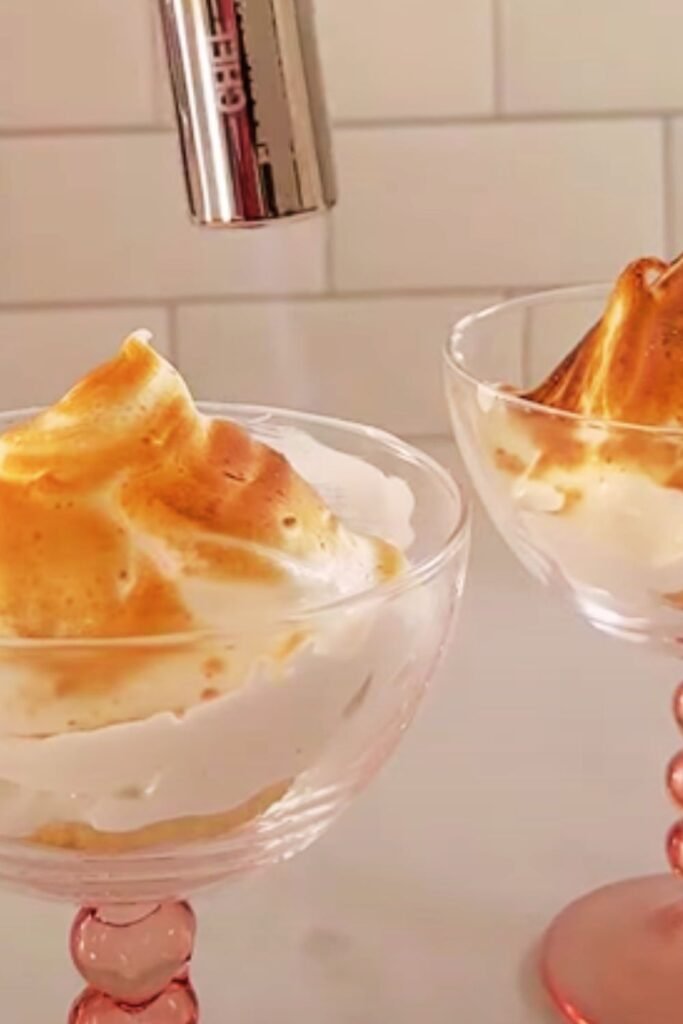
Torching and Serving
The final torching step transforms your Baked Alaska from impressive to absolutely spectacular. I use a kitchen torch with adjustable flame control, working in smooth, continuous motions to avoid creating hot spots that might burn the meringue.
Torching Technique Breakdown
Distance Control: I maintain a 4-6 inch distance between the torch and meringue surface, adjusting based on flame intensity.
Movement Pattern: Circular motions work best, starting from the bottom and working upward to prevent dripping.
Color Development: I aim for deep golden brown peaks with lighter valleys, creating natural-looking contrast.
Safety Considerations: Always torch in a well-ventilated area, away from flammable materials, with a bowl of water nearby.
Nutritional Information and Dietary Considerations
Understanding the nutritional profile helps when serving guests with dietary restrictions or health concerns.
Nutritional Breakdown (Per Serving – 8 servings total)
| Nutrient | Amount | % Daily Value |
|---|---|---|
| Calories | 385 | 19% |
| Total Fat | 18g | 23% |
| Saturated Fat | 11g | 55% |
| Cholesterol | 125mg | 42% |
| Sodium | 95mg | 4% |
| Total Carbs | 52g | 19% |
| Sugars | 48g | – |
| Protein | 8g | 16% |
| Vitamin C | 12mg | 13% |
| Calcium | 180mg | 14% |
The raspberry addition provides natural antioxidants and vitamin C, while the egg whites contribute high-quality protein. However, this remains a indulgent dessert best enjoyed in moderation.
Dietary Modifications
Gluten-Free Option: Replace the sponge cake with a gluten-free cake base or use gluten-free ladyfingers.
Reduced Sugar: Use sugar-free ice cream and reduce meringue sugar by half, though this affects texture and stability.
Dairy-Free Version: Substitute coconut or cashew-based ice cream, ensuring it has similar firmness when frozen.
Troubleshooting Common Issues
Through my years of making Baked Alaska, I’ve encountered and solved virtually every problem that can arise. Let me share the most common issues and their solutions:
Problem-Solution Matrix
| Issue | Cause | Prevention | Solution |
|---|---|---|---|
| Weeping Meringue | Humidity or underbeaten whites | Use Italian meringue method | Torch immediately before serving |
| Melted Ice Cream | Insufficient freezing time | Freeze minimum 4 hours | Refreeze if caught early |
| Soggy Cake | Excess moisture from ice cream | Use absorbent cake base | Replace cake layer |
| Burnt Meringue | Torch too close or too long | Practice distance control | Scrape burnt areas, re-pipe |
| Collapsed Structure | Assembly took too long | Work quickly, pre-chill tools | Start over with frozen components |
The most critical factor I’ve learned is temperature management throughout the entire process. Every component should be at its optimal temperature during assembly, and the final product should be served immediately after torching.
Creative Variations and Flavor Combinations
Once you’ve mastered the basic vanilla-raspberry combination, numerous variations become possible. I enjoy experimenting with different flavors while maintaining the classic structure.
Seasonal Adaptations:
- Summer: Peach ice cream with fresh basil
- Fall: Cinnamon ice cream with apple compote
- Winter: Peppermint ice cream with chocolate chips
- Spring: Lemon ice cream with fresh berries
Gourmet Combinations:
- Salted caramel ice cream with toasted nuts
- Coffee ice cream with chocolate cake base
- Strawberry ice cream with balsamic reduction
- Pistachio ice cream with rose water meringue
Each variation requires slight adjustments to the base recipe, particularly in balancing sweetness and acidity levels. I always taste-test new combinations before committing to a full recipe.
Storage and Make-Ahead Tips
Proper planning makes serving Baked Alaska much less stressful. I’ve developed a timeline that allows for maximum make-ahead preparation while maintaining quality.
Make-Ahead Timeline
3 Days Before:
- Prepare and freeze cake base
- Make ice cream mixture if using homemade
1 Day Before:
- Assemble ice cream dome
- Prepare meringue components (separate eggs, measure sugar)
Day of Serving:
- Make meringue
- Assemble dessert
- Torch just before serving
Storage Guidelines: The assembled dessert (without meringue) can be frozen for up to one week when properly wrapped. Once meringue is applied and torched, the dessert should be served within 30 minutes for optimal texture and appearance.
Serving Suggestions and Presentation
Presentation elevates Baked Alaska from dessert to dining experience. I always dim the lights slightly when bringing the torched dessert to the table, allowing the golden meringue to catch the light dramatically.
Plating Techniques:
- Use a heated knife for clean slices
- Serve on chilled plates to slow melting
- Garnish with fresh raspberries and mint
- Drizzle plates with raspberry coulis
Accompaniment Options:
- Fresh berry medley
- Shortbread cookies
- Chocolate wafer cookies
- Espresso or coffee service
- Sparkling cider or fruit juice
The key to successful service lies in organization and timing. I pre-slice the dessert in the kitchen, arranging portions on individual plates before bringing them to the table.
Questions and Answers
Q: How far in advance can I make the ice cream component? I can prepare the raspberry-vanilla ice cream mixture up to one week ahead. The key is ensuring it’s properly wrapped to prevent freezer burn and maintaining consistent freezer temperature.
Q: What’s the best way to achieve perfectly stiff meringue peaks? Room temperature egg whites whip more easily than cold ones. I also ensure my bowl and beaters are completely clean and free from any fat residue, which can prevent proper whipping.
Q: Can I use a broiler instead of a kitchen torch for browning? While possible, I don’t recommend it. Broilers provide less control and can quickly burn the meringue. If you must use a broiler, watch carefully and rotate the dessert frequently.
Q: Why does my meringue sometimes weep or become watery? Weeping typically occurs when the meringue is underbeaten or when humidity is high. Using the Italian meringue method and serving immediately after torching prevents this issue.
Q: How do I prevent the ice cream from melting during assembly? Work quickly and keep all components as cold as possible. I chill my serving plate and tools beforehand, and I complete the entire assembly process in under 10 minutes.
Q: What’s the ideal serving size for Baked Alaska? I typically cut my Baked Alaska into 8 generous portions. The richness of the dessert means smaller servings are usually sufficient and more enjoyable.
Q: Can I make individual-sized Baked Alaskas instead of one large dessert? Absolutely! Individual portions are actually easier to manage and create a more elegant presentation. Use small ramekins or molds for shaping the ice cream portions.
Q: How do I know when the meringue is properly torched? Look for deep golden brown peaks with lighter valleys. The meringue should feel firm to the touch and have a slightly crispy exterior while remaining soft inside.
Creating a perfect Vanilla-Raspberry Baked Alaska requires patience, practice, and attention to detail, but the results are absolutely worth the effort. This spectacular dessert never fails to impress guests and provides a satisfying challenge for ambitious home bakers. With proper preparation and timing, you’ll create a memorable finale to any special dinner that showcases both your culinary skills and creativity.