I’ve been making pita bread for over a decade, and I can tell you that there’s nothing quite like the satisfaction of watching those flat circles of dough puff up into perfect pockets in my oven. The aroma that fills my kitchen, the soft texture, and the versatility of homemade pita bread never cease to amaze me. Today, I’m sharing everything I’ve learned about creating this Middle Eastern staple that has become a beloved bread around the world.
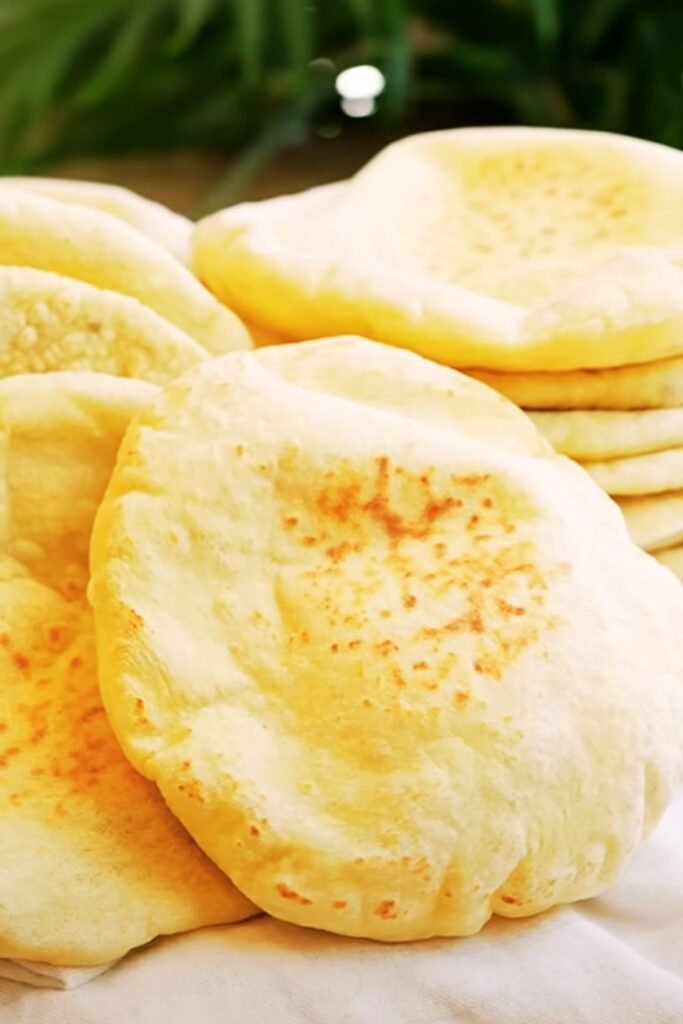
Pita bread, also known as Arabic bread or pocket bread, is a round, flat bread that originated in the Middle East thousands of years ago. What makes pita bread special is its unique ability to form a pocket when baked at high temperatures. This pocket makes it incredibly versatile for stuffing with various fillings, from traditional falafel and hummus to modern sandwich ingredients.
Understanding Pita Bread: Key Definitions
Pita Bread : A round, flat bread that puffs up during baking to create a hollow pocket inside, traditionally made with wheat flour, water, yeast, and salt.
Pocket Formation : The characteristic hollow space that forms inside pita bread when steam created during baking separates the top and bottom layers of dough.
Levantine Cuisine : The traditional cooking style of the Eastern Mediterranean region where pita bread originated, including countries like Lebanon, Syria, Palestine, and Jordan.
Gluten Development : The process of kneading dough to create elastic protein networks that give pita bread its chewy texture and ability to hold its shape.
Steam Puffing : The baking technique where high heat creates steam inside the dough, causing it to inflate and form the characteristic pocket.
My Journey with Pita Bread
When I first attempted making pita bread, I was frustrated by flat, dense rounds that bore no resemblance to the fluffy pockets I’d enjoyed at Middle Eastern restaurants. Through trial and error, I discovered that success depends on several critical factors: proper dough hydration, adequate gluten development, correct resting periods, and most importantly, baking at the right temperature.
The breakthrough came when I realized that my oven wasn’t hot enough. Pita bread needs intense heat to create the steam that forms those magical pockets. Once I started preheating my oven to 475°F (245°C) and using a pizza stone, my pita bread transformed from disappointing flatbread to restaurant-quality perfection.
Essential Ingredients for Perfect Pita Bread
The beauty of pita bread lies in its simplicity. I use only five basic ingredients, but the quality and proportions of each one matter tremendously.
Primary Ingredients
Bread Flour: I prefer bread flour over all-purpose flour because its higher protein content (around 12-14%) develops stronger gluten networks. This creates the elasticity needed for proper puffing.
Active Dry Yeast: Fresh yeast creates the best flavor, but active dry yeast works excellently when properly activated. I always proof my yeast in warm water with a pinch of sugar to ensure it’s alive and active.
Warm Water: The temperature is crucial – too hot kills the yeast, too cold slows fermentation. I aim for 105-110°F (40-43°C), which feels comfortably warm on my wrist.
Salt: Beyond flavor, salt strengthens gluten structure and controls yeast activity. I use fine sea salt or kosher salt.
Olive Oil: A small amount adds richness and helps create a tender crumb. Extra virgin olive oil provides the best flavor.

Detailed Pita Bread Recipe
Ingredients Table
| Ingredient | Amount | Baker’s Percentage | Purpose |
|---|---|---|---|
| Bread Flour | 3 cups (360g) | 100% | Structure and gluten development |
| Active Dry Yeast | 1 packet (2¼ tsp) | 1.9% | Leavening agent |
| Warm Water | 1¼ cups (300ml) | 83% | Hydration and yeast activation |
| Fine Salt | 1 tsp (6g) | 1.7% | Flavor and gluten strengthening |
| Olive Oil | 2 tbsp (30ml) | 8.3% | Texture and flavor |
| Sugar | 1 tsp (4g) | 1.1% | Yeast food |
Step-by-Step Instructions
Yeast Activation
- In a small bowl, I combine warm water with sugar and sprinkle yeast over the surface
- Let it sit for 5-10 minutes until foamy and doubled in size
- If the mixture doesn’t foam, the yeast is dead and needs to be replaced
Dough Formation
- In a large mixing bowl, I combine flour and salt
- Create a well in the center and pour in the activated yeast mixture and olive oil
- Using a wooden spoon, I mix until a shaggy dough forms
- Turn the dough onto a floured surface for kneading
Kneading Process
- Knead for 8-10 minutes until the dough becomes smooth and elastic
- The dough should spring back when poked gently
- Add small amounts of flour if the dough is too sticky
- Proper kneading develops the gluten necessary for pocket formation
First Rise
- Place the dough in an oiled bowl, turning to coat all sides
- Cover with a damp towel and let rise in a warm place for 1-2 hours
- The dough should double in size during this time
Shaping
- Punch down the risen dough and divide into 8 equal portions
- Roll each portion into a ball and let rest for 10 minutes
- On a floured surface, roll each ball into a 6-7 inch circle
- The dough should be about ¼ inch thick – not too thin or thick
Second Rise
- Place rolled circles on parchment-lined baking sheets
- Cover with kitchen towels and let rise for 30 minutes
- This final rise is crucial for proper puffing
Baking Techniques for Perfect Pockets
Oven Preparation
The key to successful pita bread lies in creating an environment similar to a traditional wood-fired oven. I preheat my oven to 475°F (245°C) with a pizza stone or heavy baking sheet on the middle rack. This high heat is essential for rapid steam creation.
Baking Process
Temperature Control : Maintain consistent high heat throughout baking. Opening the oven door releases heat and steam, preventing proper puffing.
Steam Creation : Some bakers place a pan of water in the oven, but I find this unnecessary if the dough has proper hydration.
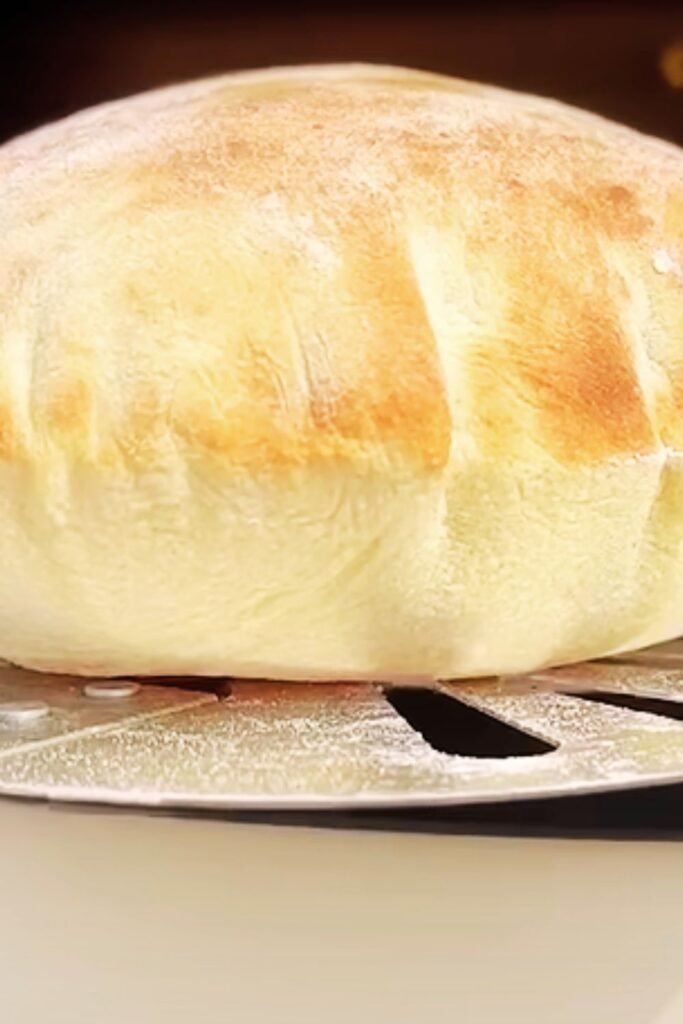
Timing : Bake for 3-4 minutes until puffed and lightly golden. Overbaking creates tough, dry pita.
Visual Cues : Look for dramatic puffing within the first 2 minutes. The pita should balloon up like a pillow.
Nutritional Information and Health Benefits
Nutritional Breakdown per Pita (1 piece)
| Nutrient | Amount | Daily Value % |
|---|---|---|
| Calories | 165 | 8% |
| Carbohydrates | 33g | 11% |
| Protein | 5.5g | 11% |
| Fat | 2.5g | 4% |
| Fiber | 1.3g | 5% |
| Sodium | 322mg | 14% |
| Iron | 2.1mg | 12% |
| Thiamine | 0.4mg | 27% |
| Niacin | 3.2mg | 20% |
| Folate | 86mcg | 22% |
Health Benefits
Pita bread offers several nutritional advantages over regular bread. The fermentation process makes nutrients more bioavailable, and the bread’s structure allows for controlled portion sizes. When made with whole wheat flour, pita provides increased fiber, B vitamins, and minerals.
The bread’s pocket design naturally encourages the inclusion of vegetables and lean proteins, making it an excellent vehicle for balanced meals. I often recommend pita to clients looking to increase their vegetable intake while maintaining satisfying meals.
Troubleshooting Common Issues
Problem-Solution Matrix
| Issue | Possible Causes | My Solutions |
|---|---|---|
| Flat, no pockets | Oven too cool, dough too thick | Increase temperature, roll thinner |
| Tough texture | Overkneading, overbaking | Knead just until smooth, reduce baking time |
| Dense bread | Inactive yeast, insufficient rising | Test yeast freshness, ensure warm environment |
| Uneven puffing | Inconsistent thickness | Use ruler guide, practice rolling technique |
| Dry pita | Overbaking, low hydration | Reduce baking time, increase water slightly |
Advanced Troubleshooting
When my pita bread doesn’t puff properly, I examine several factors systematically. First, I check my oven temperature with a separate thermometer – many ovens run cooler than their settings indicate. Second, I evaluate my dough consistency; it should be soft and slightly tacky but not sticky. Third, I consider the rolling technique – uneven thickness prevents uniform puffing.
Variations and Flavor Enhancements
Whole Wheat Pita
Replace up to half the bread flour with whole wheat flour for increased nutrition and nutty flavor. I add an extra 2-3 tablespoons of water to compensate for the additional fiber.
Herb-Infused Pita
I incorporate dried herbs like oregano, thyme, or za’atar into the dough for Mediterranean flair. Use 1-2 tablespoons of dried herbs mixed into the flour.
Sourdough Pita
Replace commercial yeast with ½ cup active sourdough starter and reduce water by 2 tablespoons. This creates tangy, complex flavors but requires longer fermentation.
Spiced Pita
Add ground cumin, coriander, or nigella seeds to the dough for Middle Eastern authenticity. Start with 1 teaspoon of spice per batch.
Storage and Preservation
Short-Term Storage
Fresh pita bread stays soft for 2-3 days when stored in airtight containers at room temperature. I wrap cooled pita in clean kitchen towels before placing in containers to maintain moisture balance.
Long-Term Storage
For longer storage, I freeze pita bread in freezer bags for up to 3 months. Individual wrapping prevents freezer burn and allows for single-serving thawing.
Reheating Techniques
To restore freshness, I briefly warm pita in a 350°F (175°C) oven for 2-3 minutes or wrap in damp paper towels and microwave for 20-30 seconds.
Serving Suggestions and Pairings
Traditional Applications
Mediterranean Mezze : Serve with hummus, baba ganoush, tabbouleh, and olives for authentic Middle Eastern flavors.
Stuffed Sandwiches : Fill pockets with falafel, grilled vegetables, and tahini sauce for satisfying meals.
Breakfast Options : I love pita with scrambled eggs, fresh herbs, and crumbled feta cheese.
Modern Innovations
Pizza Pockets : Stuff with marinara sauce, mozzarella, and favorite toppings for quick personal pizzas.
Dessert Pitas : Fill with fresh fruit, honey, and Greek yogurt for healthy desserts.
Soup Accompaniment : Serve alongside hearty soups as an alternative to crackers or bread bowls.
Cultural Significance and Global Variations
Pita bread holds deep cultural significance throughout the Mediterranean and Middle Eastern regions. In my travels, I’ve discovered fascinating regional variations – from the thick, chewy Lebanese pita to the thin, crispy Greek version. Each culture has adapted the basic recipe to local preferences and available ingredients.
The bread’s role extends beyond mere sustenance; it serves as a utensil in many cultures, replacing forks and spoons for scooping and eating. This practical application influenced my own cooking style, encouraging me to think creatively about bread’s function in meals.
Equipment Recommendations
Essential Tools
Digital Kitchen Scale : Accurate measurements ensure consistent results. I weigh ingredients for the best outcomes.
Pizza Stone or Steel : Provides even heat distribution and crispy bottoms. Preheat for at least 30 minutes.
Bench Scraper : Helps divide dough evenly and clean work surfaces efficiently.
Rolling Pin : French-style pins without handles give better control for even thickness.
Optional Equipment
Stand Mixer : While not necessary, a stand mixer with dough hook simplifies kneading for large batches.
Proofing Basket : Creates ideal rising conditions, especially in cooler kitchens.
Oven Thermometer : Ensures accurate temperature readings for consistent baking results.
Frequently Asked Questions
Q: Why didn’t my pita bread puff up? The most common reason is insufficient oven heat. Make sure your oven reaches 475°F (245°C) and use a pizza stone or heavy baking sheet. Also check that your dough isn’t rolled too thick – aim for ¼ inch thickness.
Q: Can I make pita bread without a stand mixer? Absolutely! I hand-knead pita dough regularly. It takes 8-10 minutes of kneading to develop proper gluten structure. The dough should feel smooth and elastic when ready.
Q: How do I know if my yeast is still active? Proof your yeast in warm water with a pinch of sugar. If it foams and doubles in size within 5-10 minutes, it’s active. Dead yeast won’t foam and needs replacement.
Q: Can I freeze pita bread dough? Yes, you can freeze shaped pita rounds before the second rise. Thaw completely, let rise for 30 minutes, then bake as directed. This is great for meal prep.
Q: What’s the difference between pita and naan bread? Pita is typically unleavened or lightly leavened and creates pockets, while naan is heavily leavened, often contains dairy, and doesn’t form pockets. Naan is also traditionally baked in tandoor ovens.
Q: How can I make my pita bread softer? Increase hydration slightly by adding 1-2 tablespoons more water, and don’t overbake. Cover hot pita with a kitchen towel immediately after baking to retain moisture.
Q: Is it normal for some pita to not puff completely? Yes, even experienced bakers occasionally get flat pita. Factors like uneven rolling, temperature fluctuations, or dough handling can affect puffing. The bread is still delicious and usable.
Q: Can I make pita bread with whole wheat flour? Certainly! Replace up to 50% of bread flour with whole wheat flour. Add extra water as whole wheat absorbs more moisture. The flavor will be nuttier and more complex.
Q: How long does homemade pita bread last? Fresh pita stays good for 2-3 days at room temperature in airtight containers. For longer storage, freeze for up to 3 months. Reheat frozen pita in a 350°F oven for 2-3 minutes.
Q: What’s the best way to reheat leftover pita? Wrap in slightly damp paper towels and microwave for 20-30 seconds, or warm in a 350°F oven for 2-3 minutes. This restores softness and flexibility.
Making perfect pita bread has become one of my favorite kitchen accomplishments. The process connects me to ancient baking traditions while providing my family with fresh, healthy bread. Each batch teaches me something new about dough behavior, oven performance, or flavor development. I encourage you to embrace the learning process – even imperfect pita bread tastes wonderful and improves with practice.
The versatility of homemade pita bread extends far beyond traditional uses. I’ve discovered countless creative applications, from breakfast wraps to dessert pockets. The satisfaction of creating this staple from basic ingredients never diminishes, and the aroma of fresh pita baking brings family and friends together around my kitchen table.
Start with my basic recipe, master the fundamental techniques, then experiment with variations that suit your taste preferences. Remember that successful pita bread relies on proper temperature, adequate hydration, and patient fermentation. With these elements in place, you’ll soon be creating bakery-quality pita bread that rivals any store-bought version.