I’ve been making burrito bowls for years, and I can confidently say this one-pan version has revolutionized my weeknight dinner routine. There’s something magical about combining tender, perfectly seasoned chicken with vibrant vegetables and fluffy rice—all cooked in a single pan. What started as my attempt to recreate my favorite restaurant burrito bowl has evolved into a family staple that saves me time, dishes, and delivers incredible flavor every single time.
The beauty of this recipe lies in its simplicity and efficiency. In just 30 minutes, you’ll have a complete, nutritious meal that rivals any restaurant version. I’ve tested this recipe countless times, tweaking the spice blend and cooking method until I achieved that perfect balance of flavors and textures that makes each bite satisfying and delicious.
Why This One-Pan Method Works
Traditional burrito bowls require multiple pots and pans—one for rice, another for chicken, and yet another for sautéing vegetables. My one-pan approach eliminates this chaos while actually improving the final result. The chicken juices infuse the rice with incredible flavor, while the vegetables maintain their crispness and vibrant colors.
I discovered this technique during a particularly busy week when I needed to feed my family but had minimal time for cleanup. The results were so impressive that I never went back to the multi-pan method. The layered cooking approach ensures everything finishes at the same time, with each component perfectly cooked.
Essential Ingredients Breakdown
Protein Foundation
- Chicken thighs (boneless, skinless): 1.5 pounds, cut into bite-sized pieces
- Olive oil: 2 tablespoons for cooking
- Lime juice: From 2 fresh limes for brightness
Spice Blend Magic
- Chili powder: 2 teaspoons for warmth
- Cumin: 1 teaspoon for earthiness
- Paprika: 1 teaspoon for color and smokiness
- Garlic powder: 1 teaspoon for depth
- Onion powder: 1/2 teaspoon for complexity
- Oregano: 1/2 teaspoon for herbaceous notes
- Salt: 1 teaspoon for seasoning
- Black pepper: 1/2 teaspoon for heat
Rice Base
- Long-grain white rice: 1 cup, uncooked
- Chicken broth: 2 cups for enhanced flavor
- Diced tomatoes: 1 can (14.5 oz), drained
Fresh Vegetables
- Bell peppers: 2 medium, diced (mix of colors)
- Red onion: 1 medium, diced
- Corn kernels: 1 cup (fresh, frozen, or canned)
- Black beans: 1 can (15 oz), drained and rinsed
Step-by-Step Cooking Process
Phase 1: Preparing the Chicken (8 minutes)
I start by heating my largest skillet or wide, shallow pan over medium-high heat. The key is using a pan that’s large enough to accommodate all ingredients without overcrowding. I add olive oil and let it shimmer before adding the chicken pieces.
The chicken should sizzle immediately when it hits the pan. I season it generously with my spice blend, ensuring every piece gets coated. I cook the chicken for about 6-8 minutes, stirring occasionally, until it’s golden brown and cooked through. The internal temperature should reach 165°F.
Phase 2: Building the Rice Layer (2 minutes)
Once the chicken is cooked, I push it to one side of the pan. In the cleared space, I add the uncooked rice, stirring it for about 1-2 minutes until it’s lightly toasted. This step adds a nutty flavor that elevates the entire dish.
I then add the drained diced tomatoes and chicken broth, stirring everything together. The liquid should come to a gentle simmer almost immediately.
Phase 3: Simmering and Layering (15 minutes)
I bring the mixture to a boil, then reduce the heat to low and cover the pan. This is where patience becomes crucial. I let it simmer for 12 minutes without lifting the lid. The steam creates the perfect environment for the rice to cook evenly.
After 12 minutes, I quickly add the bell peppers, onions, and corn on top of the rice without stirring. I cover again and cook for another 3 minutes. This method ensures the vegetables retain their crispness while heating through.
Phase 4: Final Assembly (5 minutes)
I remove the pan from heat and let it sit covered for 5 minutes. This resting period allows the rice to finish cooking and the flavors to meld together. During this time, I warm the black beans in a small saucepan or microwave.
When I finally lift the lid, the aroma is absolutely incredible. I gently fold in the warmed black beans and give everything a careful stir, being mindful not to break up the rice grains.
Nutritional Information and Benefits
| Nutrient | Per Serving (1/4 recipe) | % Daily Value |
|---|---|---|
| Calories | 485 | 24% |
| Protein | 32g | 64% |
| Total Fat | 12g | 15% |
| Saturated Fat | 3g | 15% |
| Carbohydrates | 58g | 21% |
| Dietary Fiber | 8g | 29% |
| Sugars | 7g | – |
| Sodium | 890mg | 39% |
| Potassium | 850mg | 18% |
| Vitamin A | 2,100 IU | 42% |
| Vitamin C | 95mg | 105% |
| Calcium | 85mg | 6% |
| Iron | 4.2mg | 23% |
This burrito bowl provides an excellent balance of macronutrients, with high-quality protein from the chicken, complex carbohydrates from the rice and beans, and essential vitamins and minerals from the colorful vegetables. The combination of beans and rice creates a complete protein, making this dish particularly satisfying and nutritionally complete.
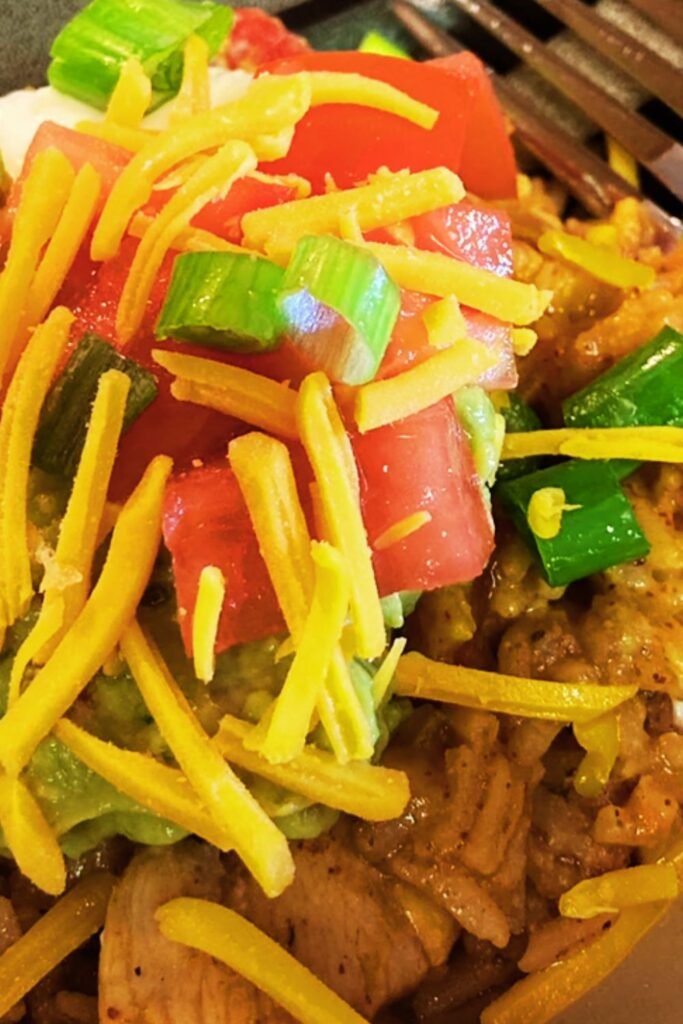
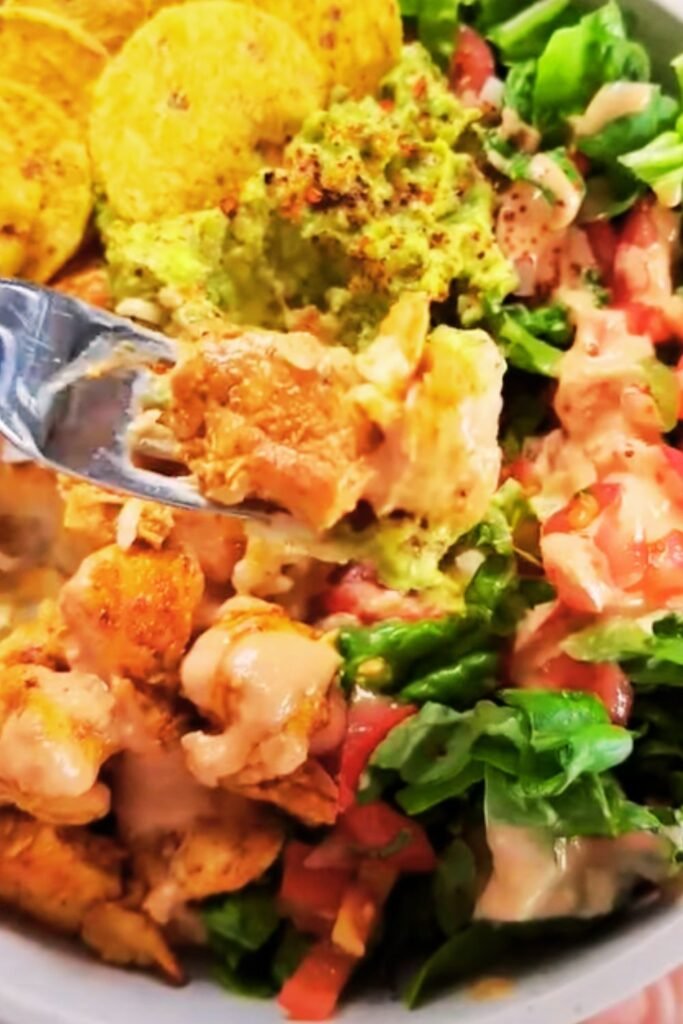
Topping Ideas and Customizations
Fresh Toppings
- Avocado slices: Adds creaminess and healthy fats
- Fresh cilantro: Provides brightness and freshness
- Lime wedges: Essential for that final citrus pop
- Diced tomatoes: Extra freshness and acidity
- Red onion: Adds sharpness and crunch
Creamy Additions
- Sour cream: Classic cooling element
- Greek yogurt: Healthier alternative to sour cream
- Guacamole: Rich and flavorful
- Cheese: Shredded cheddar, Monterey Jack, or queso fresco
Crunchy Elements
- Tortilla strips: Adds texture and corn flavor
- Crushed tortilla chips: For extra crunch
- Toasted pumpkin seeds: Nutty and nutritious
- Pickled jalapeños: For heat and tang
Meal Prep and Storage Solutions
This burrito bowl is exceptional for meal prep. I often make a double batch on Sunday and portion it into glass containers for the week. The flavors actually improve after a day or two as they meld together.
Storage Guidelines
- Refrigerator: Keeps fresh for up to 4 days
- Freezer: Can be frozen for up to 3 months
- Reheating: Add a splash of broth when reheating to restore moisture
Meal Prep Tips
I recommend storing the toppings separately to maintain their freshness and texture. The base (chicken, rice, beans, and cooked vegetables) reheats beautifully, while fresh toppings like avocado and cilantro should be added just before serving.
Serving Suggestions and Pairings
This burrito bowl is incredibly versatile and can be served in numerous ways. I often serve it family-style, allowing everyone to customize their own bowl with their favorite toppings. It’s also excellent for entertaining because it looks impressive while being surprisingly simple to make.
Alternative Serving Methods
- Burrito wraps: Use the mixture as filling for large tortillas
- Taco filling: Serve in hard or soft taco shells
- Salad base: Serve over mixed greens for a lighter option
- Stuffed peppers: Use as filling for bell peppers
Complementary Sides
- Fresh fruit salad: Provides a refreshing contrast
- Corn tortillas: For those who want to make tacos
- Chips and salsa: Classic Mexican-inspired pairing
- Lime-cilantro rice: If you want extra rice on the side
Troubleshooting Common Issues
Rice Problems
Issue: Rice is too dry or undercooked Solution: Add more broth, 1/4 cup at a time, and continue cooking covered
Issue: Rice is mushy or overcooked Solution: Remove lid and cook uncovered for 2-3 minutes to evaporate excess moisture
Chicken Concerns
Issue: Chicken is tough or dry Solution: Don’t overcook; use a meat thermometer and remove at 165°F
Issue: Chicken lacks flavor Solution: Marinate the chicken in lime juice and spices for 30 minutes before cooking
Vegetable Texture
Issue: Vegetables are too soft Solution: Add them later in the cooking process or increase heat briefly
Recipe Variations and Adaptations
Protein Alternatives
- Ground turkey: Substitute pound-for-pound for chicken
- Beef: Use ground beef or diced steak
- Shrimp: Add in the last 3 minutes of cooking
- Vegetarian: Double the beans and add extra vegetables
Dietary Modifications
- Gluten-free: Naturally gluten-free as written
- Dairy-free: Skip cheese toppings or use dairy-free alternatives
- Low-carb: Serve over cauliflower rice instead of regular rice
- Vegan: Replace chicken with extra beans and vegetables
Spice Level Adjustments
- Mild: Reduce chili powder and omit black pepper
- Medium: Add diced jalapeños with the vegetables
- Spicy: Include cayenne pepper and hot sauce
- Extra hot: Add diced serrano peppers and chipotle powder
The Science Behind One-Pan Cooking
The success of this recipe relies on understanding how different ingredients cook at different rates and temperatures. By starting with the protein, which takes the longest to cook, I build layers of flavor that infuse throughout the dish.
The rice absorbs the rendered chicken fat and seasonings, creating a much more flavorful base than plain steamed rice. The vegetables are added at the end to maintain their texture and nutritional value, while the brief steaming period ensures they’re heated through without becoming mushy.
Time-Saving Tips and Shortcuts
Prep-Ahead Strategies
- Spice blend: Mix all spices in advance and store in an airtight container
- Vegetable prep: Dice vegetables the night before
- Chicken prep: Cut and season chicken up to 24 hours ahead
Quick Cooking Hacks
- Instant rice: Reduces cooking time to 15 minutes total
- Pre-cooked chicken: Use rotisserie chicken, added in the last 5 minutes
- Frozen vegetables: Steam-in-bag vegetables work perfectly
Q&A Section
Q. Can I make this recipe with brown rice instead of white rice? I absolutely recommend trying brown rice, though you’ll need to adjust the cooking time and liquid. Use 2.5 cups of broth instead of 2 cups, and increase the simmering time to 18-20 minutes. The nutty flavor of brown rice pairs beautifully with the spices.
Q. What’s the best way to prevent the rice from sticking to the bottom of the pan? The key is maintaining the right temperature and not stirring once you add the liquid. Use medium-low heat after bringing it to a boil, and make sure your pan has a thick bottom for even heat distribution. I also recommend using a non-stick or well-seasoned pan.
Q. Can I double this recipe for a larger crowd? Absolutely! I often double it for gatherings. You’ll need a very large pan or two separate pans. If using one large pan, you might need to increase the cooking time by 2-3 minutes to ensure everything cooks evenly.
Q. How do I know when the chicken is properly cooked? The chicken should reach an internal temperature of 165°F. Visually, it should be golden brown on the outside and no longer pink in the center. If you cut into a piece, the juices should run clear, not pink.
Q. What can I substitute for chicken broth if I don’t have any? You can use vegetable broth, beef broth, or even water with a bouillon cube. For extra flavor, I sometimes use half broth and half water with a tablespoon of tomato paste mixed in.
Q. Is it normal for the rice to look dry before adding the liquid? Yes, toasting the rice briefly makes it look dry and slightly golden. This step is crucial for developing flavor and helping the rice maintain its texture during cooking.
Q. Can I add cheese directly to the pan while cooking? I don’t recommend adding cheese during cooking as it can burn or become stringy. It’s much better to add cheese as a topping after the dish is finished, allowing it to melt naturally from the heat of the food.
Q. How can I make this recipe spicier without overpowering the other flavors? Start by adding a pinch of cayenne pepper to the spice blend. You can also include diced jalapeños with the vegetables or add a few dashes of hot sauce during the final stir. Build heat gradually rather than adding too much at once.
Q. What should I do if I accidentally burn the bottom of the pan? If you notice burning, immediately remove the pan from heat and transfer the unburned portion to a clean pan. Add a little more broth to prevent further sticking, and continue cooking at a lower temperature.
Q. Can I make this recipe in a slow cooker or Instant Pot? While the one-pan stovetop method gives the best texture, you can adapt it for other appliances. For an Instant Pot, use the sauté function for the chicken, then add rice and liquid for a 4-minute pressure cook with natural release. Slow cooker versions work but may result in softer vegetables.
This one-pan chicken burrito bowl has become my go-to solution for busy weeknights when I want something satisfying, nutritious, and full of flavor. The combination of tender chicken, perfectly cooked rice, and vibrant vegetables creates a restaurant-quality meal that’s ready in just 30 minutes. Whether you’re meal prepping for the week or feeding a hungry family, this recipe delivers consistent results every time.
The beauty of this dish lies in its versatility—you can customize it with your favorite toppings, adjust the spice level to your preference, and even adapt it for different dietary needs. I hope this recipe becomes as beloved in your kitchen as it has in mine, bringing both convenience and delicious flavors to your dinner table.