There’s something magical about the simplicity of perfectly cooked fish. As someone who has spent years experimenting with seafood recipes, I’ve found that cod—with its mild flavor and flaky texture—is perhaps the most versatile canvas for both novice and experienced home cooks. Today, I’m sharing my absolute favorite way to prepare this wonderful fish: Pan Fried Cod with Lemon Butter Sauce.
This dish holds a special place in my kitchen repertoire because it transforms an ordinary weeknight into something restaurant-worthy in less than 30 minutes. The contrast between the crispy exterior and the tender, moist interior of the cod, all bathed in a silky lemon butter sauce, creates a symphony of textures and flavors that will impress even the most discerning palates.
What makes this recipe truly special is not just its delicious outcome, but its accessibility. You don’t need fancy equipment or obscure ingredients—just fresh cod, pantry staples, and about 25 minutes from start to finish. The techniques you’ll learn here are foundational cooking skills that will serve you well beyond this single recipe.
So let’s dive into creating a dish that proves sometimes the most straightforward preparations yield the most extraordinary results.
Ingredients
For the Cod
- 4 cod fillets (about 6 ounces each), skin removed
- ½ cup all-purpose flour
- 1 teaspoon kosher salt
- ½ teaspoon freshly ground black pepper
- ¼ teaspoon paprika (sweet or smoked)
- ⅛ teaspoon garlic powder
- 3 tablespoons olive oil
- 2 tablespoons unsalted butter
For the Lemon Butter Sauce
- 4 tablespoons unsalted butter
- 3 cloves garlic, minced
- Juice of 1 large lemon (about 3 tablespoons)
- Zest of 1 lemon
- 2 tablespoons fresh parsley, finely chopped
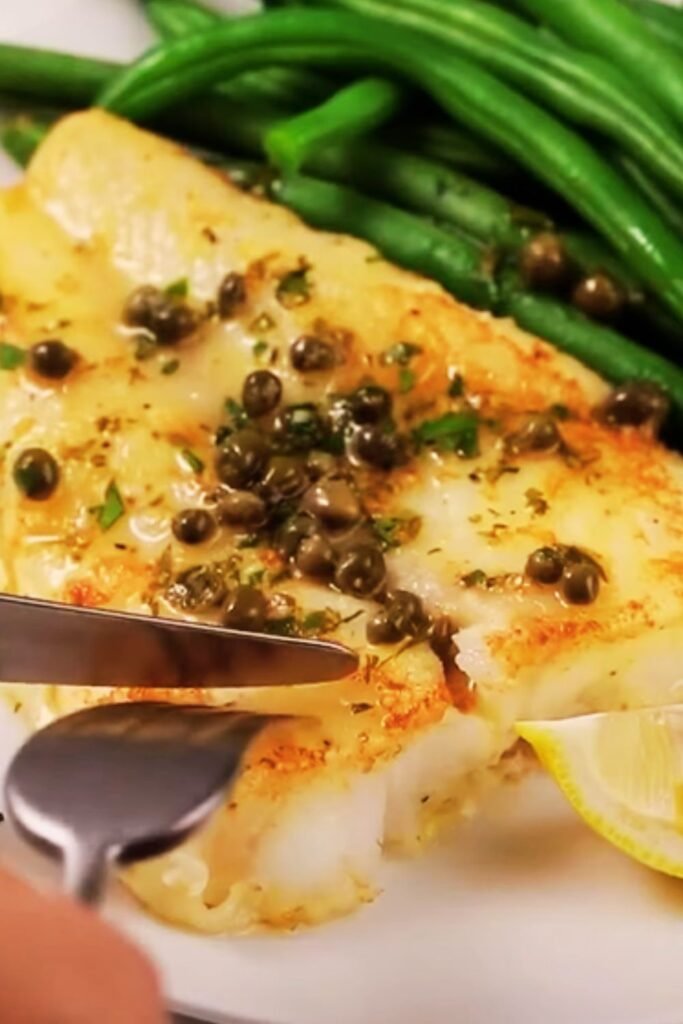
- 1 tablespoon capers, drained (optional)
- ¼ teaspoon red pepper flakes (optional)
- Salt and freshly ground black pepper to taste
Equipment Needed
- 12-inch non-stick skillet or cast iron pan
- Fish spatula or wide turner
- Paper towels
- Small saucepan
- Microplane or zester
- Cutting board
- Sharp knife
- Shallow dish for dredging
- Instant-read thermometer (optional but helpful)
Understanding Cod
Before we jump into cooking, let’s take a moment to appreciate our star ingredient. Cod is a cold-water fish found primarily in the North Atlantic and North Pacific oceans. There are two main varieties you’ll encounter at the market:
Atlantic Cod : Traditionally the more common variety, with a slightly sweeter flavor and larger flakes. Due to overfishing concerns, it’s now less abundant and often more expensive.
Pacific Cod : Slightly less sweet than Atlantic cod, with a firmer texture and smaller flakes. More sustainable and usually more affordable.
Either variety works beautifully for this recipe, so choose based on availability, sustainability preferences, and budget. The most important factor is freshness.
How to Select Fresh Cod
When purchasing cod, look for:
- Flesh that appears translucent and glistening rather than dull or opaque
- A mild, ocean-like smell—never fishy or ammonia-like
- Firm flesh that springs back when pressed gently
- Clear, not cloudy, eyes if buying a whole fish
- Bright red gills if buying a whole fish
If fresh cod isn’t available, high-quality frozen cod is an excellent alternative. Just be sure to thaw it properly in the refrigerator overnight before cooking.
Preparation Steps
Step 1: Prepare the Cod
- Remove the cod fillets from the refrigerator 15-20 minutes before cooking to take the chill off. Excessive cold can cause the fish to seize and cook unevenly.
- Pat the fillets thoroughly dry with paper towels. This step is crucial—moisture is the enemy of a good sear and crispy exterior.
- Check for any pin bones by running your finger gently along the surface of the fillet, and remove any you find with clean tweezers or needle-nose pliers.
Step 2: Season and Dredge
- In a shallow dish, combine the flour, salt, pepper, paprika, and garlic powder. Mix well to ensure even distribution of the seasonings.
- Just before cooking, lightly season both sides of the cod fillets directly with a pinch of salt and pepper.
- Dredge each fillet in the seasoned flour mixture, shaking off any excess. You want a thin, even coating—not a thick batter.
Chef’s Tip: The flour coating serves multiple purposes: it helps develop a golden crust, protects the delicate fish from direct heat, and provides a surface for the sauce to cling to. Don’t skip this step!
Step 3: Pan Fry the Cod
- Heat a large non-stick or cast iron skillet over medium-high heat. Add the olive oil and allow it to get hot—you’ll see it shimmer slightly.
- Add 2 tablespoons of butter to the hot oil. The combination of oil and butter allows for higher-heat cooking while still imparting the rich flavor of butter.
- Once the butter has melted and stopped foaming, carefully add the cod fillets, presentation side down (usually the non-skin side).
- Cook undisturbed for 3-4 minutes until the bottom develops a golden-brown crust.
- Using a fish spatula, gently flip each fillet and cook for an additional 2-3 minutes on the second side.
Chef’s Tip: The key to perfectly cooked fish is knowing when it’s done. Cod should reach an internal temperature of 145°F (63°C), or you can check for doneness by gently inserting a fork into the thickest part—properly cooked cod will flake easily and appear opaque throughout.
Step 4: Prepare the Lemon Butter Sauce
- While the cod is cooking on the second side, begin preparing the sauce in a separate small saucepan over medium-low heat.
- Add the 4 tablespoons of butter and allow it to melt slowly.
- Add the minced garlic and sauté for 30-60 seconds until fragrant but not browned.
- Reduce heat to low and add the lemon juice, lemon zest, and red pepper flakes (if using).
- Stir gently to combine and keep warm on low heat.
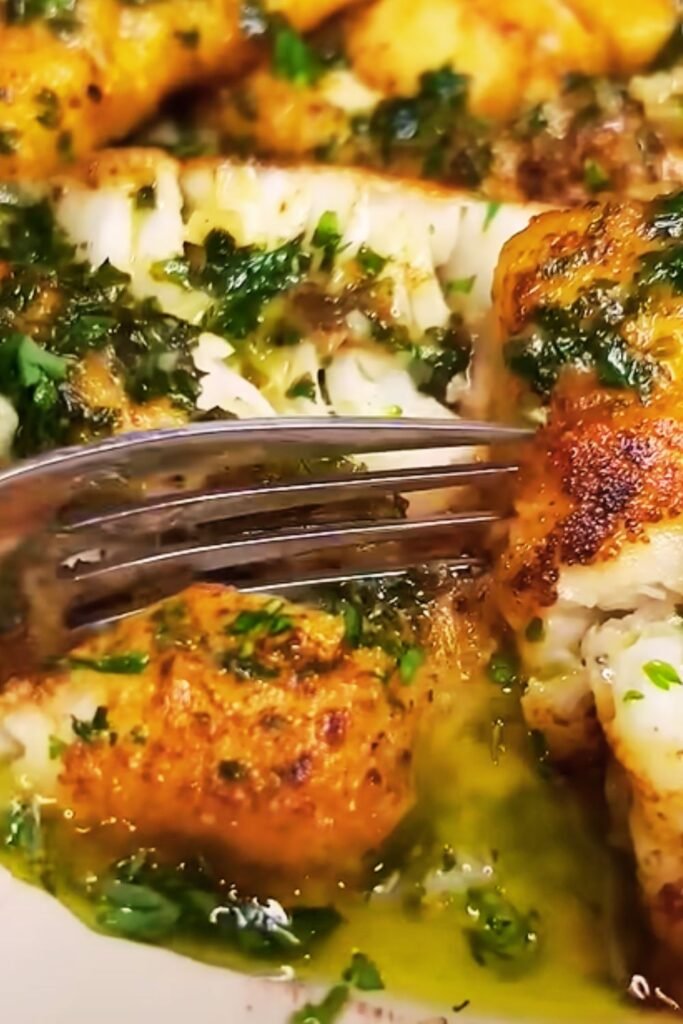
- Just before serving, stir in the fresh parsley and capers (if using).
- Taste and adjust seasonings with salt and pepper.
Step 5: Serve
- Once the cod is cooked through, immediately transfer to warm plates.
- Give the lemon butter sauce a final stir and spoon generously over each fillet.
- Garnish with additional fresh parsley and lemon wedges if desired.
The Science Behind Perfect Pan-Fried Fish
Understanding a few basic principles of cooking science can help you achieve perfect results every time:
- Dry Surface = Better Sear: Moisture on the surface of the fish will create steam, preventing proper browning. This is why thoroughly patting the fillets dry is so important.
- The Maillard Reaction: This chemical reaction between amino acids and reducing sugars gives browned food its distinctive flavor. For fish, we want to encourage this reaction on the exterior while keeping the interior moist.
- Carryover Cooking: Fish continues to cook after being removed from heat. To prevent overcooking, consider removing the cod from the pan when it reaches about 140°F, as it will reach the target 145°F while resting.
- Acidic Balance: The lemon in the sauce not only adds brightness but also helps cut through the richness of the butter, creating a balanced flavor profile.
Nutritional Information
For those monitoring their intake, here’s a breakdown of approximate nutritional values per serving (one 6 oz cod fillet with sauce):
| Nutrient | Amount |
|---|---|
| Calories | 320 |
| Protein | 28g |
| Fat | 19g |
| Saturated Fat | 9g |
| Carbohydrates | 8g |
| Fiber | 0.5g |
| Sugar | 0.5g |
| Sodium | 450mg |
| Cholesterol | 105mg |
| Vitamin D | 15% DV |
| Calcium | 2% DV |
| Iron | 4% DV |
| Potassium | 12% DV |
Variations and Substitutions
My basic recipe is delicious as is, but don’t be afraid to make it your own! Here are some tested variations:
Alternative Fish Options
If cod isn’t available, try these excellent substitutes:
- Haddock: Very similar to cod in flavor and texture
- Pollock: Slightly stronger flavor but works well
- Halibut: More expensive but extraordinarily delicious
- Mahi-mahi: Firmer texture, holds up well
- Sea bass: More buttery flavor, ideal for special occasions
Sauce Variations
Herb Butter: Add 1 tablespoon each of fresh dill and chives to the basic sauce for an herbal dimension.
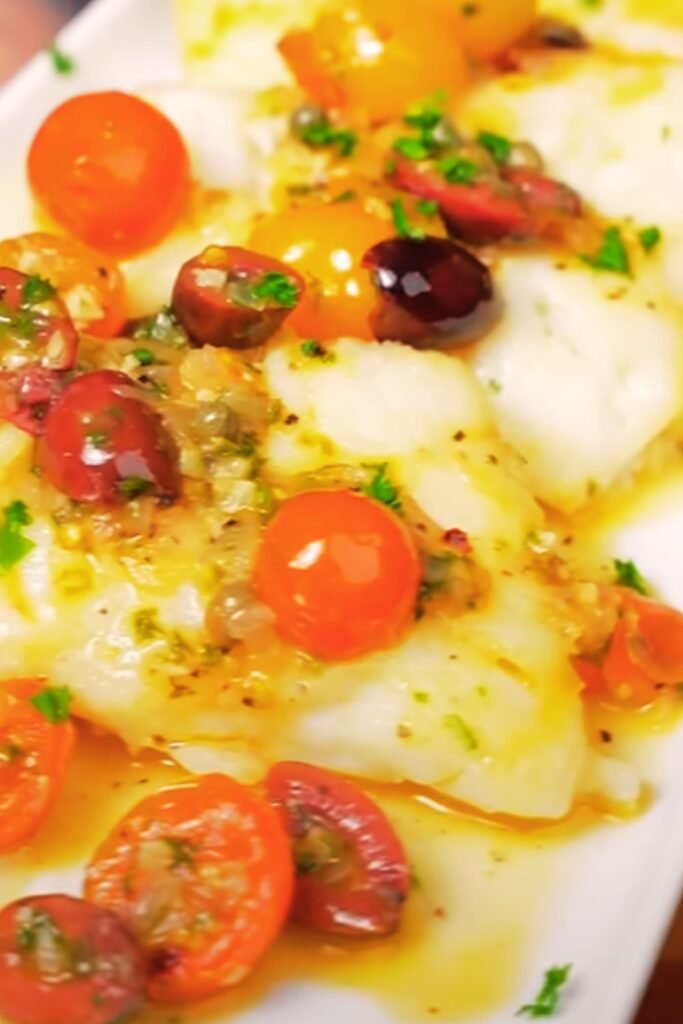
Mediterranean Style: Include 2 tablespoons of finely diced sun-dried tomatoes and 1 tablespoon of chopped olives to the sauce.
Dijon Cream: Reduce lemon to 1 tablespoon, add 2 tablespoons of heavy cream and 1 teaspoon of Dijon mustard to the sauce.
White Wine Butter: Replace half the lemon juice with dry white wine and reduce slightly before adding the remaining ingredients.
Dietary Adaptations
Gluten-Free: Replace all-purpose flour with rice flour or a gluten-free flour blend.
Dairy-Free: Substitute olive oil or a plant-based butter alternative for the butter in both the cooking process and sauce.
Low-Carb/Keto: Replace the flour with almond flour or simply season the fish directly and cook without dredging.
Paleo: Use almond flour for dredging and ghee instead of butter.
Common Problems and Solutions
| Problem | Possible Cause | Solution |
|---|---|---|
| Fish sticks to the pan | Pan not hot enough or fish surface was wet | Ensure pan is properly heated and fish is thoroughly dried |
| Fish breaks apart when flipping | Flipped too soon or using wrong utensil | Wait until a crust forms before flipping; use a proper fish spatula |
| Butter burns in the pan | Heat too high | Use combination of oil and butter; lower heat slightly |
| Soggy coating instead of crisp | Too much flour or overcrowded pan | Shake off excess flour; cook in batches if necessary |
| Fish overcooked and dry | Cooked too long or at too high heat | Use timer and thermometer; adjust heat as needed |
| Sauce “breaks” or separates | Heat too high or boiled the sauce | Keep sauce at low heat; whisk gently if separation begins |
Serving Suggestions
This elegant yet simple dish deserves thoughtful accompaniments. Here are my favorite pairings:
Starchy Sides
- Garlic mashed potatoes
- Lemon herb rice pilaf
- Crusty artisan bread for sauce-sopping
- Roasted fingerling potatoes with herbs
- Creamy polenta
Vegetables
- Roasted asparagus
- Sautéed green beans with almonds
- Simple side salad with vinaigrette
- Steamed broccoli with lemon zest
- Roasted cherry tomatoes
- Wilted spinach with garlic
Complete Menu Ideas
Weeknight Simple: Pan fried cod with lemon butter sauce, steamed jasmine rice, and roasted broccoli
Mediterranean Inspired: Pan fried cod, olive oil smashed potatoes, and Greek salad
Spring Special: Pan fried cod, asparagus risotto, and lemon glazed carrots
Light Summer Meal: Pan fried cod, quinoa salad with cucumber and tomato, and grilled zucchini
Make-Ahead and Storage Tips
While pan-fried cod is best enjoyed immediately after cooking, here are some preparation and storage strategies:
Prep-Ahead Elements
- Mix the seasoned flour mixture up to 3 days ahead and store in an airtight container.
- Prepare the garlic, lemon zest, and herbs up to a day ahead; store separately in the refrigerator.
- If using frozen cod, thaw properly in the refrigerator 24 hours before cooking.
Storing Leftovers
- Refrigerate leftover cooked cod in an airtight container for up to 2 days.
- Store leftover sauce separately in the refrigerator for up to 3 days.
Reheating Tips
- For best results, reheat the cod gently in a covered skillet with a tablespoon of water to create steam, over low heat.
- Alternatively, reheat in a 275°F oven, covered with foil, until just warmed through (about 10-15 minutes).
- Microwave reheating is not recommended as it can make the fish rubbery.
- Reheat the sauce over low heat, whisking occasionally. You may need to add a teaspoon of water to revive it.
Repurposing Leftovers
Leftover cod makes excellent:
- Fish tacos with slaw and avocado
- Seafood pasta with the reheated lemon butter sauce
- Fish cakes when flaked and mixed with mashed potato and herbs
- Cold cod salad with greens and a light vinaigrette
The Health Benefits of Cod
Cod isn’t just delicious—it’s also packed with nutrients that make this recipe a healthy choice for your dinner table:
- High-Quality Protein: Cod provides approximately 20 grams of protein per 3-ounce serving, supporting muscle maintenance and growth.
- Low in Fat: With only about 1 gram of fat per serving, cod is one of the leanest protein sources available.
- Rich in B Vitamins: Particularly B12 and B6, which support energy metabolism and brain function.
- Excellent Source of Minerals: Notably phosphorus, selenium, and potassium, which support bone health, immune function, and heart health respectively.
- Omega-3 Fatty Acids: While not as rich as fattier fish like salmon, cod still provides beneficial omega-3s that support heart and brain health.
FAQ Section
Q: Can I use frozen cod for this recipe?
A: Absolutely! Just make sure to thaw it completely in the refrigerator overnight and pat it thoroughly dry before cooking. Frozen cod can actually be fresher than “fresh” cod in some inland locations, as it’s often frozen right on the fishing boats.
Q: How can I tell if my cod is fresh?
A: Fresh cod should have a mild, ocean-like smell (never fishy or ammonia-like), translucent flesh that’s firm to the touch, and should spring back when pressed gently. If buying whole fish, look for clear eyes and bright red gills.
Q: My sauce separated and looks oily. What happened?
A: This typically happens when the sauce gets too hot. Remove it from heat immediately and whisk vigorously. If that doesn’t work, try whisking in a teaspoon of cold water to help it re-emulsify.
Q: Is there a non-dairy alternative for the butter?
A: Yes! You can use olive oil or a high-quality plant-based butter substitute. The flavor will be slightly different but still delicious. For the sauce, adding a tiny bit of nutritional yeast can help replicate some of the richness lost when removing butter.
Q: How thick should the cod fillets be?
A: Ideally, look for fillets that are about 1 to 1½ inches at their thickest point. This allows for a nice crust on the outside while the inside cooks to perfection. If your fillets are thinner (under ¾ inch), reduce the cooking time by about a minute per side.
Q: Can I make this dish ahead for a dinner party?
A: While it’s best served fresh, you can prepare everything up to the point of cooking the fish. Have your dredging mixture ready, sauce components measured, and sides prepared. Then cook the fish and finish the sauce right before serving. The entire cooking process takes less than 10 minutes once everything is prepped.
Q: My fish always sticks to the pan. What am I doing wrong?
A: Three key things prevent sticking: a properly heated pan, thoroughly dried fish, and patience. Heat your pan well before adding oil, pat your fish completely dry, and—most importantly—resist the urge to move the fish before a crust has formed. When the fish is ready to flip, it will release more easily from the pan.
Q: What’s the difference between dredging in flour versus breadcrumbs?
A: Flour provides a lighter coating that becomes gently crisp and helps protect the delicate fish. Breadcrumbs create a more substantial, crunchy crust. This recipe uses flour for a more elegant result that complements the delicate sauce, but you could substitute panko breadcrumbs if you prefer more texture.
Conclusion
Pan Fried Cod with Lemon Butter Sauce represents what I love most about cooking—transforming simple ingredients into something truly special through attention to detail and proper technique. The contrast between the crisp exterior and flaky interior of the fish, complemented by the bright, rich sauce, creates a dish that feels indulgent yet comes together in minutes.
I hope this recipe becomes a favorite in your kitchen as it has in mine. There’s something deeply satisfying about mastering a dish that’s both accessible enough for busy weeknights and impressive enough for special occasions. With each preparation, you’ll likely develop your own little tweaks and preferences—that’s the beauty of cooking.
Remember that the foundations of this dish—properly heating your pan, thoroughly drying the fish, seasoning adequately, and not disturbing the fish while it develops a crust—are techniques that will serve you well across countless other recipes.
So gather your ingredients, heat your pan, and prepare to enjoy a meal that proves sometimes the simplest preparations yield the most memorable results. Happy cooking!