There’s something truly magical about cracking through that perfectly caramelized sugar crust to reveal the silky, creamy custard beneath. Crème brûlée might sound fancy and intimidating, but I’m here to let you in on a little secret – it’s actually one of the easiest impressive desserts you can make at home!
When I first attempted this classic French dessert, I was surprised by how simple the ingredients list is. Just a handful of quality components transform into something extraordinary with a bit of patience and technique. Don’t let the fancy French name fool you – if you can whisk eggs and operate a kitchen torch (or even your oven’s broiler), you can absolutely nail this recipe.
In this guide, I’ll walk you through every step of creating this elegant dessert in your own kitchen. From selecting the right vanilla to achieving that perfect sugar crack, I’ve got all the tips and tricks you need to impress your guests (or just treat yourself). Let’s dive into the delicious world of crème brûlée!
What Is Crème Brûlée?
Crème brûlée (pronounced “krem broo-LAY”) is a classic French dessert consisting of a rich custard base topped with a layer of hardened caramelized sugar. The name literally translates to “burnt cream,” referring to the signature caramelized sugar crust that’s created by heating sugar until it forms a brittle, amber-colored topping.
The contrast between the cool, silky vanilla custard and the warm, crackling sugar crust creates an unforgettable sensory experience that has made this dessert a staple on restaurant menus worldwide. Despite its sophisticated reputation, the dessert is surprisingly straightforward, requiring just a few quality ingredients.
Ingredients You’ll Need
For this easy crème brûlée recipe that serves 4, you’ll need:
- 2 cups (480ml) heavy cream
- 1 vanilla bean (or 1 tablespoon pure vanilla extract)
- 5 large egg yolks
- ½ cup (100g) granulated sugar, plus extra for the topping
- Pinch of salt
- Fresh berries for garnish (optional)
Equipment:
- 4 ramekins (4-6 oz capacity)
- Large baking dish (for water bath)
- Small saucepan
- Mixing bowls
- Whisk
- Fine mesh sieve (optional but recommended)
- Kitchen torch (or your oven’s broiler)
The Science Behind Perfect Crème Brûlée
What makes this dessert so special? Let’s break down the science:
The Custard Base: Crème brûlée is technically a stirred custard, meaning it’s thickened primarily by egg yolks. When heated gently, proteins in the egg yolks unravel and form a network that traps water molecules and creates that signature smooth, creamy texture.
The Water Bath (Bain-Marie): Baking in a water bath is crucial because it provides gentle, even heat that prevents the eggs from cooking too quickly and curdling. The water temperature never exceeds boiling point (212°F/100°C), which ensures your custard stays smooth instead of turning into sweet scrambled eggs.
The Caramelization: The magic happens when heat is applied to sugar. Around 320°F (160°C), sugar begins to break down and form new compounds that create those complex caramel flavors and that beautiful amber color. The rapid heating and cooling create the hard, glass-like surface that provides the signature “crack” when tapped with a spoon.
Step-by-Step Instructions
Preparing the Vanilla Cream Base
- Preheat your oven to 325°F (165°C).
- In a medium saucepan, heat the heavy cream over medium-low heat.
- If using a vanilla bean, split it lengthwise and scrape out the seeds. Add both the seeds and the pod to the cream. If using extract, you’ll add it later.
- Heat the cream until it’s hot but not boiling – look for small bubbles around the edges of the pan. Remove from heat and let it steep for about 15 minutes if you used a vanilla bean. (Remove the vanilla pod after steeping.)
- If using vanilla extract instead of a bean, stir it into the cream after removing from heat.
Making the Custard
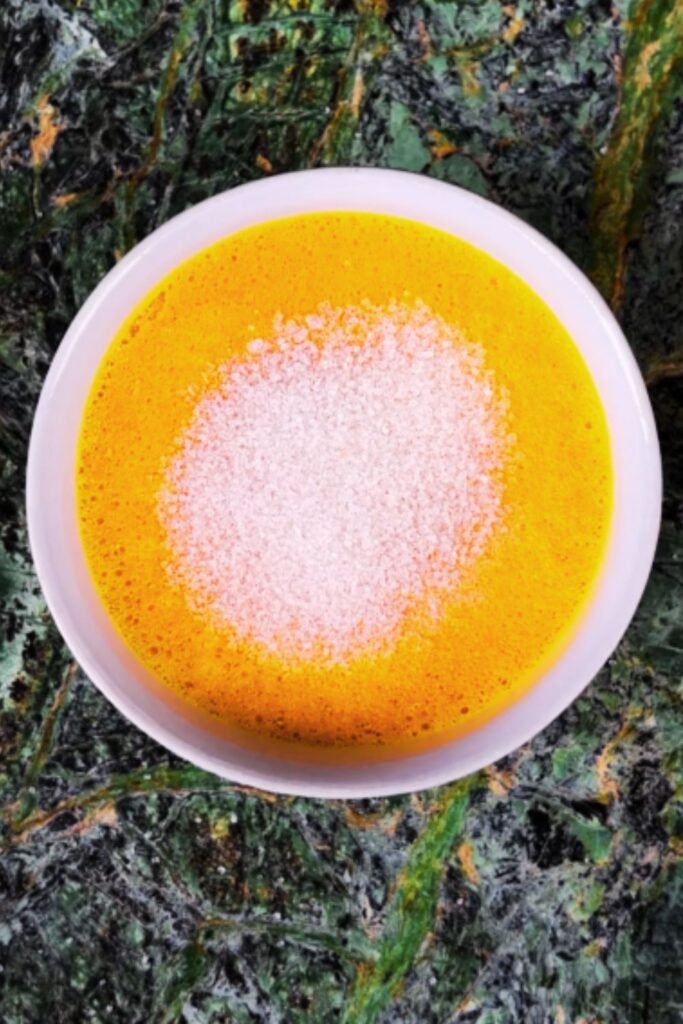
- In a medium bowl, whisk together the egg yolks, sugar, and pinch of salt until the mixture is pale yellow and slightly thickened (about 2-3 minutes).
- Very gradually pour the hot cream into the egg mixture, whisking constantly. This technique is called “tempering” and prevents the eggs from cooking and curdling.
- For the smoothest result, pour the mixture through a fine-mesh sieve into a clean bowl or measuring cup with a spout. This removes any bits of cooked egg or vanilla bean that might affect the texture.
Baking the Crème Brûlée
- Arrange your ramekins in a large baking dish or roasting pan.
- Carefully pour the custard mixture into the ramekins, filling them about ¾ of the way full.
- Pour hot (not boiling) water into the baking dish until it reaches about halfway up the sides of the ramekins. This water bath is essential for gentle, even cooking.
- Carefully transfer the baking dish to the preheated oven.
- Bake for 30-35 minutes, or until the custards are set but still slightly jiggly in the center. They should be firm at the edges but wobble slightly in the middle when gently shaken.
- Carefully remove the ramekins from the water bath and let them cool completely at room temperature.
- Once cooled, cover each ramekin with plastic wrap and refrigerate for at least 4 hours, or preferably overnight. This chilling time is crucial for developing flavor and texture.
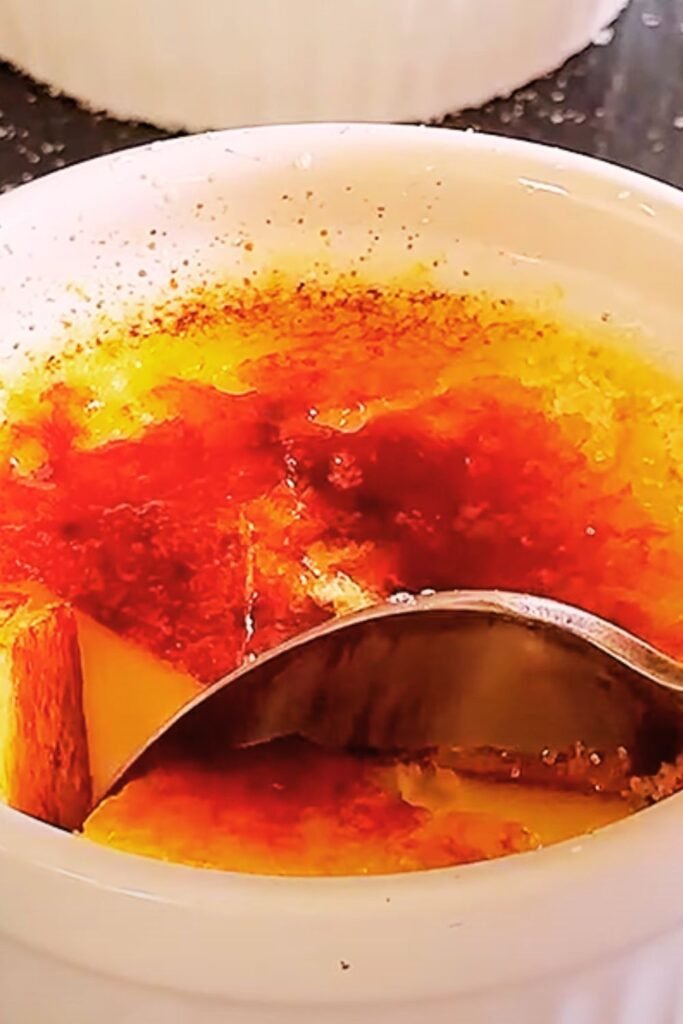
Creating the Signature Caramelized Top
- When ready to serve, remove the crème brûlées from the refrigerator and gently blot any moisture from the surface with a paper towel.
- Sprinkle a thin, even layer of granulated sugar over each custard (about 1-2 teaspoons per ramekin). Tilt and tap the ramekins to distribute the sugar evenly.
- If using a kitchen torch (the preferred method): Hold the torch 3-4 inches from the surface and move it in circular motions until the sugar melts and turns a deep amber color. Don’t hold the flame in one spot for too long.
- If using a broiler: Place the ramekins on a baking sheet and position them about 2-3 inches below the broiler. Watch carefully – the sugar can go from caramelized to burnt in seconds! Rotate as needed for even browning.
- Let the caramelized sugar cool and harden for about 5 minutes before serving.
Tips for Crème Brûlée Success
| Challenge | Solution | Why It Works |
|---|---|---|
| Custard not setting | Ensure proper oven temperature and adequate baking time | Eggs need to reach 160°F (71°C) to set properly |
| Weeping custard | Don’t overbake and use proper water bath level | Overbaking causes proteins to tighten and expel moisture |
| Sugar won’t caramelize properly | Use superfine sugar and ensure surface is dry | Finer sugar melts more evenly; moisture prevents caramelization |
| Burnt sugar topping | Keep torch moving or watch broiler carefully | Sugar burns at approximately 350°F (177°C) |
| Custard has eggy taste | Use fresh eggs and don’t overheat | High heat can bring out sulfur compounds in eggs |
| Runny center | Extend baking time by 3-5 minutes | Center needs to reach setting temperature |
| Cracked tops | Avoid rapid temperature changes | Gentle cooling prevents surface tension |
Flavor Variations
While classic vanilla crème brûlée is perfection, there are endless ways to customize this dessert:
Citrus Infused
Add the zest of one orange, lemon, or lime to the hot cream and let it steep along with the vanilla. Strain before mixing with egg yolks.
Coffee Crème Brûlée
Add 2 tablespoons of instant espresso powder or 1/4 cup of finely ground coffee beans to the cream as it heats. Strain well before proceeding.
Chocolate Lover’s Version
Add 4 ounces of chopped high-quality chocolate to the hot cream and stir until melted and smooth before tempering with the egg mixture.
Seasonal Spice
Infuse the cream with a cinnamon stick, star anise, or cardamom pods during the heating process. Remove the spices before mixing with eggs.
Liqueur Enhancement
After the custard is mixed, stir in 1-2 tablespoons of your favorite liqueur – Grand Marnier, Frangelico, or Amaretto work beautifully.
Make-Ahead and Storage Information
Crème brûlée is the perfect make-ahead dessert, which makes it ideal for entertaining:
| Stage | Storage Method | Maximum Storage Time | Notes |
|---|---|---|---|
| Unbaked custard mixture | Refrigerated, covered | 24 hours | Whisk well before using |
| Baked custards without sugar topping | Refrigerated, tightly wrapped | 3 days | Best flavor develops after 24 hours |
| Completed crème brûlée | Not recommended for storage | Serve within 30 minutes | Sugar top will soften if stored |
| Leftover crème brûlée | Refrigerated, loosely covered | 2 days | Sugar topping will dissolve |
For the absolute best presentation and that perfect crack, I always caramelize the sugar topping just before serving. Once the sugar has been caramelized, the dessert should be enjoyed within 30 minutes for optimal texture.
Serving Suggestions
Crème brûlée is a showstopper on its own, but here are some elegant serving ideas:
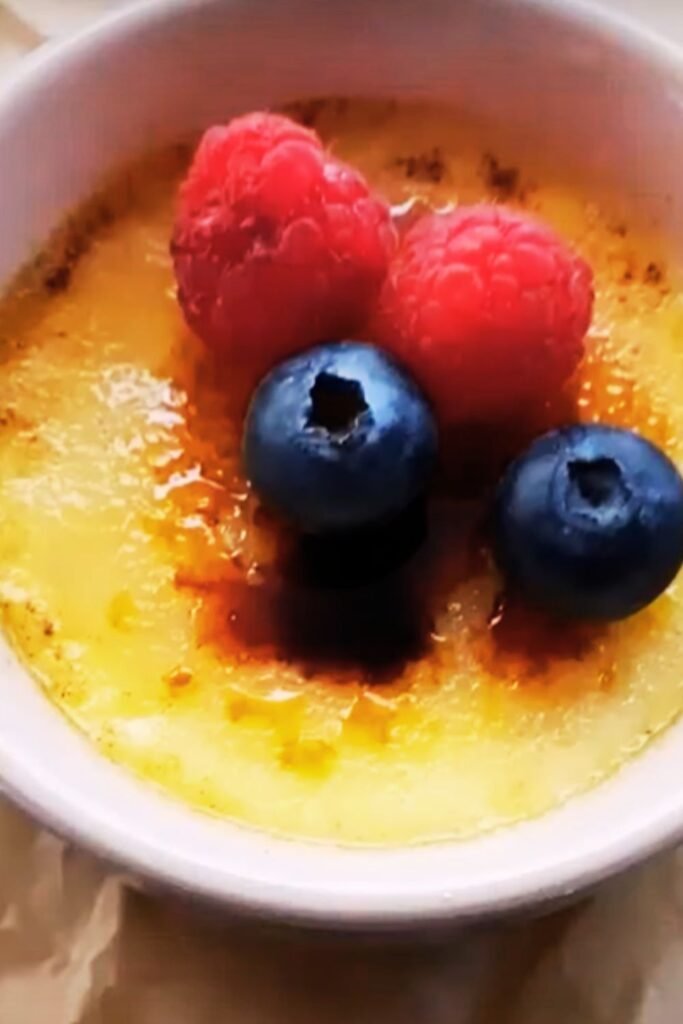
- Garnish with fresh seasonal berries – raspberries and blackberries provide a beautiful color contrast
- Add a small sprig of mint for color and freshness
- Serve with a small shortbread cookie on the side
- Dust the plate with a small amount of powdered sugar for a professional presentation
- For a dramatic presentation, flambe a small amount of orange liqueur in a separate vessel and pour around (not on) the crème brûlée
Remember, the beauty of this dessert lies in its simplicity – sometimes less is more when it comes to accompaniments.
Nutritional Information
While crème brûlée is definitely an indulgence, it’s good to know what you’re enjoying. Here’s the approximate nutritional breakdown per serving (one 4oz ramekin):
| Nutrient | Amount | % Daily Value* |
|---|---|---|
| Calories | 385 | – |
| Total Fat | 32g | 41% |
| Saturated Fat | 19g | 95% |
| Cholesterol | 285mg | 95% |
| Sodium | 85mg | 4% |
| Total Carbohydrates | 20g | 7% |
| Dietary Fiber | 0g | 0% |
| Sugars | 19g | – |
| Protein | 5g | 10% |
| Calcium | 65mg | 5% |
| Iron | 0.5mg | 3% |
| Vitamin A | 1200IU | 24% |
*Percent Daily Values are based on a 2,000 calorie diet
Troubleshooting Common Issues
Even experienced bakers sometimes encounter challenges with crème brûlée. Here’s how to address common problems:
My custard is too firm or rubbery
This usually happens when the custard is overcooked. Next time, try reducing the baking time by 3-5 minutes, and make sure your water bath comes halfway up the sides of the ramekins.
The custard didn’t set properly and is too liquidy
Undercooking is the likely culprit. The custard should jiggle slightly in the center but not be liquid. Next time, increase baking time by 3-5 minutes. Also check your oven temperature with an oven thermometer to ensure accuracy.
There are bubbles on the surface of my custard
This happens when air gets trapped in the mixture. Try pouring the custard mixture more gently into the ramekins, and consider letting it rest for 5 minutes before baking so bubbles can rise to the surface.
My sugar topping won’t caramelize evenly
Make sure the surface is completely dry before adding sugar. Try using superfine sugar for more even melting, and make sure you’re spreading it in a thin, even layer.
The caramelized sugar layer is too thick
Use less sugar next time – about 1-1½ teaspoons per ramekin is plenty. Spread it as thinly and evenly as possible before torching.
Questions & Answers
Is crème brûlée difficult to make? While crème brûlée looks impressive, it’s actually quite simple to make! With just a handful of ingredients and some basic techniques, you can create this restaurant-quality dessert at home. The most important factors are gentle heating and patience.
Do I need special equipment to make crème brûlée? You need ramekins and some way to create the caramelized sugar top. A kitchen torch is ideal but not essential – you can use your oven’s broiler in a pinch. A baking dish for the water bath and basic mixing bowls complete your equipment list.
Can I make crème brûlée ahead of time? Absolutely! In fact, the custard needs to chill for at least 4 hours before caramelizing the top. You can make the custards up to 3 days in advance and keep them covered in the refrigerator. Just wait to add and caramelize the sugar topping until right before serving.
What’s the best vanilla to use? For the most authentic and flavorful crème brûlée, vanilla beans are the gold standard. Madagascar or Tahitian vanilla beans work beautifully. However, a good quality pure vanilla extract will also produce excellent results if beans aren’t available.
Can I use brown sugar for the topping? While traditional crème brûlée uses white granulated sugar for the topping, you can experiment with light brown sugar for a deeper caramel flavor. Keep in mind that it may caramelize more quickly, so watch it carefully.
Why is my crème brûlée grainy or curdled? This usually happens when the eggs cook too quickly. Make sure you’re tempering the eggs properly by adding the hot cream very slowly while whisking constantly. Also, baking in a water bath at the correct temperature is crucial for gentle cooking.
Can I make crème brûlée without a torch? Yes! While a kitchen torch gives you the most control, you can use your oven’s broiler. Place the chilled custards on a baking sheet, sprinkle with sugar, and broil for 1-2 minutes, watching very carefully to prevent burning.
How do I know when my custard is done baking? The edges should be set, but the center should still have a slight jiggle – think of the consistency of gelatin. If you gently shake the ramekin, the center should wobble slightly but not be liquid. The custard will continue to set as it cools.
Can I make a dairy-free version of crème brûlée? Yes! You can substitute full-fat coconut milk or coconut cream for the heavy cream. The flavor will be slightly different but still delicious, with a subtle coconut undertone that complements the vanilla beautifully.
What’s the difference between crème brûlée and custard? All crème brûlées are custards, but not all custards are crème brûlées! The defining feature of crème brûlée is its caramelized sugar topping. The custard base is similar to other baked custards like flan or pot de crème, but the preparation and presentation differ.
Final Thoughts
Making crème brûlée at home is one of those culinary achievements that delivers maximum impact with relatively minimal effort. The simple combination of cream, eggs, sugar, and vanilla transforms into something truly extraordinary with the right technique.
I find there’s something deeply satisfying about cracking through that perfectly caramelized sugar crust with the back of a spoon to reveal the luscious vanilla-speckled custard beneath. It’s a sensory experience that few other desserts can match.
Don’t be intimidated by its fancy French name or restaurant reputation – with this recipe and these tips, you’re well on your way to mastering this classic dessert. And once you’ve got the basic technique down, the variations are endless.
So go ahead, impress your dinner guests (or just treat yourself) to this elegant finale to any meal. With practice, you might find that your homemade version rivals any restaurant crème brûlée you’ve ever had. Happy baking, and even happier eating!