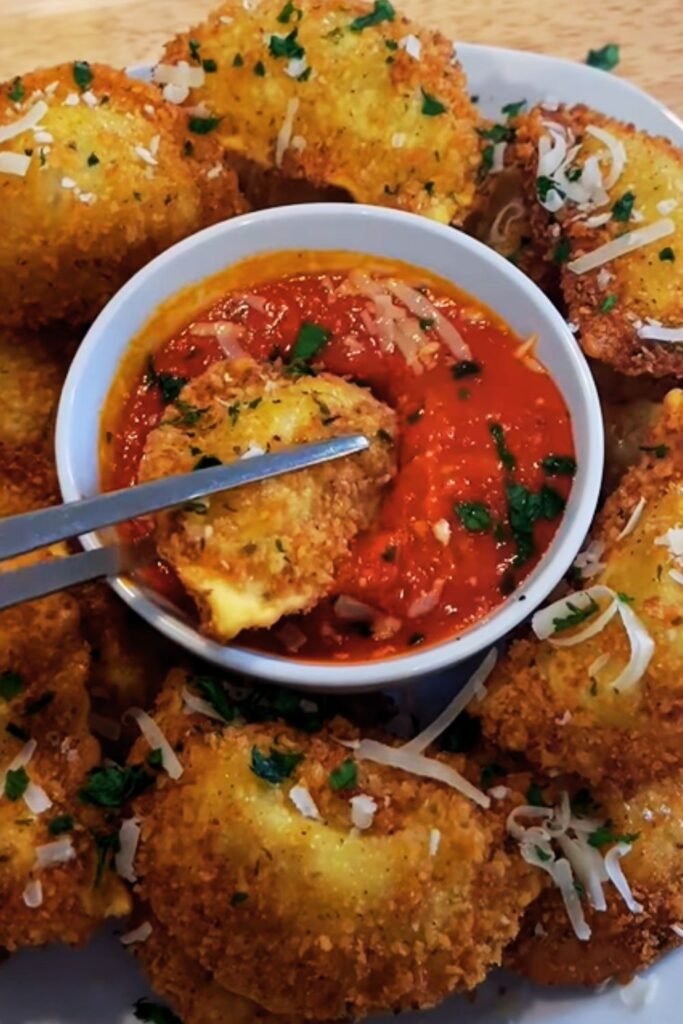
If you’re looking for an appetizer that never fails to impress, let me introduce you to one of my absolute favorites: crispy fried ravioli paired with a rich homemade marinara dipping sauce. This dish transforms ordinary store-bought ravioli into golden, crunchy delights that somehow manage to be both sophisticated and comforting at the same time.
I first discovered fried ravioli at a charming Italian restaurant in St. Louis, where it’s something of a local specialty. After my first bite, I knew I had to recreate this appetizer at home. After many attempts (and a few delicious failures), I’ve perfected my recipe, and today I’m sharing all my tips and tricks with you.
Why You’ll Love This Recipe
What makes this appetizer so special? Let me count the ways:
- The contrast between the crispy exterior and tender pasta filling is absolutely divine
- It’s surprisingly easy to make, even for beginners
- You can prepare components ahead of time for quick assembly
- It’s customizable with different ravioli fillings
- Everyone from kids to adults will be reaching for seconds
- It works as an appetizer, party snack, or even a fun dinner
But perhaps what I love most about fried ravioli is how it transforms something ordinary into something extraordinary. That first satisfying crunch followed by the savory filling and zesty marinara creates a perfect bite every time.
Essential Ingredients
Let’s break down what you’ll need to create this crowd-pleaser:
For the Fried Ravioli:
| Ingredient | Amount | Notes |
|---|---|---|
| Refrigerated ravioli | 1 pound (about 24-30 pieces) | Cheese filling works best, but choose your favorite. Fresh ravioli is ideal, but frozen will work if thawed completely. |
| All-purpose flour | 1 cup | For dredging; helps the egg wash adhere. |
| Eggs | 3 large | Creates the base for your coating to stick. |
| Milk | 2 tablespoons | Thins the egg mixture for a lighter coating. |
| Italian breadcrumbs | 2 cups | Provides the crispy exterior. |
| Grated Parmesan cheese | ¼ cup | Adds saltiness and umami flavor to the coating. |
| Dried Italian herbs | 1 tablespoon | A mix of oregano, basil, and thyme enhances the flavor. |
| Garlic powder | 1 teaspoon | For added depth of flavor. |
| Vegetable oil | 4-6 cups | For frying; enough to fill your pot 2-3 inches deep. |
| Salt | To taste | To season both the flour and breadcrumb mixture. |
| Black pepper | To taste | Freshly ground is always best. |
For the Marinara Dipping Sauce:
| Ingredient | Amount | Notes |
|---|---|---|
| Olive oil | 2 tablespoons | Use a good quality extra virgin olive oil for best flavor. |
| Garlic | 4 cloves, minced | Fresh garlic provides the best flavor base. |
| Crushed red pepper flakes | ¼ teaspoon | Adjust to your preferred spice level. |
| San Marzano tomatoes | 1 can (28 oz), crushed | These Italian plum tomatoes make all the difference in sauce flavor. |
| Tomato paste | 2 tablespoons | Adds richness and depth. |
| Fresh basil | 8-10 leaves, chopped | Adds bright, fresh flavor. |
| Dried oregano | 1 teaspoon | For classic Italian flavor. |
| Sugar | 1 teaspoon | Balances the acidity of the tomatoes. |
| Salt and black pepper | To taste | For seasoning. |
For Garnish:
| Ingredient | Purpose |
|---|---|
| Fresh parsley, chopped | Adds color and freshness |
| Additional grated Parmesan | For sprinkling over hot ravioli |
| Fresh basil leaves | Optional, for garnish |
Essential Equipment
You don’t need fancy equipment, but having these items ready will make the process smoother:
- Large pot or deep skillet for frying
- Cooking thermometer (ideal but not required)
- Slotted spoon or spider strainer
- Paper towel-lined plate or baking sheet
- Three shallow bowls for the breading station
- Medium saucepan for the marinara
- Measuring cups and spoons
Step-by-Step Instructions
Preparing the Marinara Dipping Sauce:
- Heat the olive oil in a medium saucepan over medium heat.
- Add minced garlic and red pepper flakes, sautéing until fragrant but not browned (about 30-45 seconds).
- Pour in the crushed tomatoes and tomato paste, stirring to combine.
- Add oregano, sugar, salt, and pepper.
- Bring to a gentle simmer, then reduce heat to low.
- Allow the sauce to simmer, partially covered, for about 25-30 minutes, stirring occasionally.
- In the last 5 minutes of cooking, stir in the chopped fresh basil.
- Taste and adjust seasonings as needed.
- Keep warm while preparing the ravioli, or make ahead and reheat when ready to serve.
Breading and Frying the Ravioli:
- Set up your breading station with three shallow bowls:
- Bowl 1: Flour seasoned with a pinch of salt and pepper
- Bowl 2: Eggs beaten with milk
- Bowl 3: Italian breadcrumbs mixed with Parmesan cheese, dried herbs, and garlic powder
- Pat the ravioli dry with paper towels (this is crucial for the coating to stick).
- Working with one ravioli at a time:
- Dredge in the flour, shaking off excess
- Dip into the egg mixture, allowing excess to drip off
- Coat thoroughly in the breadcrumb mixture, pressing gently to adhere
- Place on a clean plate or baking sheet
- Once all ravioli are breaded, heat the vegetable oil in a large pot or deep skillet to 350°F (175°C). If you don’t have a thermometer, test by dropping a few breadcrumbs in—they should sizzle immediately but not burn.
- Carefully add ravioli to the hot oil in batches (don’t overcrowd!), frying until golden brown and crispy, about 1-2 minutes per side.
- Remove with a slotted spoon or spider strainer and place on paper towel-lined plates to drain excess oil.
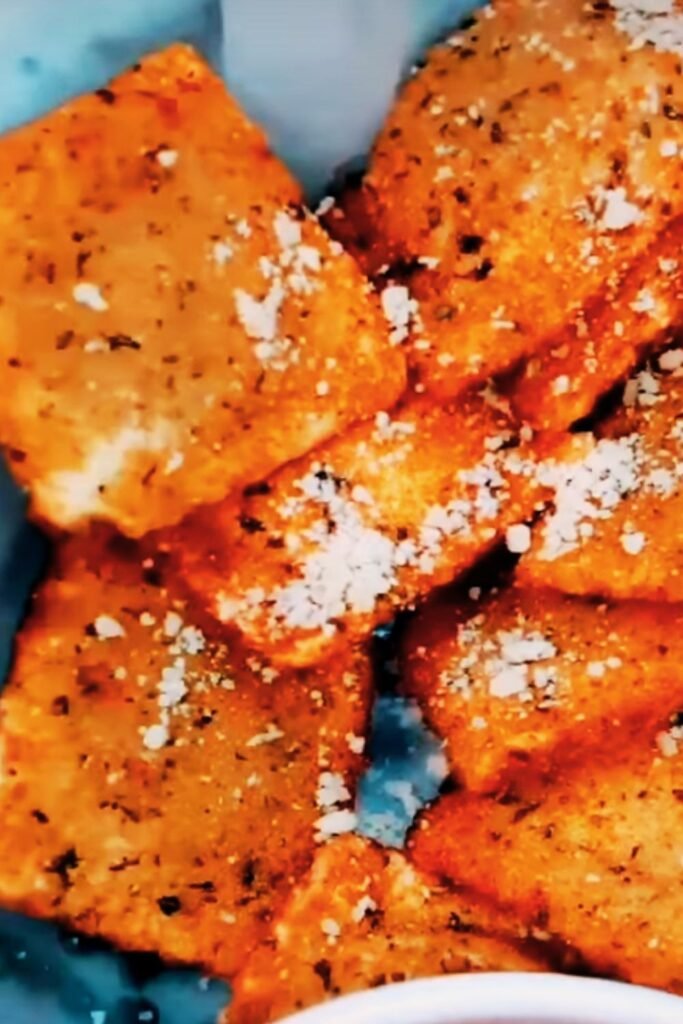
- While still hot, sprinkle with a little more grated Parmesan cheese and chopped parsley if desired.
- Serve immediately with the warm marinara dipping sauce.
Pro Tips for Perfect Fried Ravioli
Through many testing sessions in my kitchen, I’ve discovered several tips that make a significant difference:
- Keep ravioli cold until ready to bread: This helps the coating adhere better and prevents the filling from becoming too soft during frying.
- Double-coating option: For extra crispiness, you can repeat the egg and breadcrumb steps for a thicker coating. This works especially well for larger ravioli.
- Oil temperature is crucial: Too hot, and the outside burns before the inside warms through; too cool, and the ravioli absorbs too much oil and becomes greasy. Maintain a steady 350°F (175°C).
- Batch size matters: Fry in small batches to maintain oil temperature and prevent sticking. I usually do no more than 6-8 pieces at a time.
- Pat dry twice: After taking ravioli out of the package, and again right before breading. Any moisture is the enemy of crispy coating.
- Fresh is best: While you can use frozen ravioli (thawed), fresh refrigerated ravioli yields the best texture.
- Rest before serving: Let the fried ravioli rest for about 1 minute after draining. This helps the crust set up perfectly.
Flavor Variations to Try
While the classic cheese ravioli is my go-to, I’ve experimented with several delicious variations:
Different Fillings:
| Ravioli Type | Sauce Pairing | Notes |
|---|---|---|
| Classic cheese | Traditional marinara | The perfect starting point |
| Spinach and ricotta | Marinara with extra garlic | The slight bitterness of spinach works beautifully with extra garlic |
| Mushroom | Truffle-infused marinara | For an elevated, earthy flavor profile |
| Butternut squash | Brown butter sage sauce | A sweet-savory alternative to marinara |
| Meat-filled | Spicy arrabbiata sauce | The heat balances the richness perfectly |
Coating Variations:
- Add 2 tablespoons of ranch seasoning mix to the breadcrumbs for a tangy twist
- Mix in 1 teaspoon of smoked paprika for a subtle smoky flavor
- Use panko instead of regular breadcrumbs for extra crunch
- Add 2 tablespoons of finely grated lemon zest to the breadcrumbs for a bright flavor
- Substitute half the breadcrumbs with crushed pistachios for a unique nutty taste
Make-Ahead and Storage Options
I know we’re all busy, so here are some time-saving options:
Make-Ahead Options:
- Marinara sauce: Can be made up to 3 days ahead and stored in the refrigerator. It actually improves with time as flavors meld!
- Breaded ravioli: Can be prepared up to the breading step and refrigerated for up to 4 hours before frying. Place them in a single layer on a parchment-lined baking sheet and cover loosely.
- Pre-fry option: For parties, you can fry them 80% of the way there (until light golden), cool, refrigerate, then finish frying just before serving to reheat and crisp up.
Storage and Reheating:
- Refrigerator: Store leftover fried ravioli in an airtight container for up to 2 days.
- Freezer: Freeze completely cooled fried ravioli in a single layer, then transfer to freezer bags for up to 1 month.
- Reheating: For best results, reheat in a 375°F (190°C) oven for 8-10 minutes until crispy and heated through. Avoid microwaving as they’ll lose their crispness.
Serving Suggestions
Turn your fried ravioli into a complete experience with these serving ideas:
As an Appetizer:
- Arrange on a large platter with several small bowls of marinara stationed around for easy dipping
- Sprinkle with additional fresh herbs and offer lemon wedges on the side
- Serve alongside an antipasto platter with olives, cheeses, and cured meats
For a Complete Meal:
- Pair with a fresh Caesar salad or simple arugula salad with lemon vinaigrette
- Serve with roasted vegetables seasoned with Italian herbs
- Add garlic bread for a heartier meal option
- Complement with Italian-style stuffed mushrooms or bruschetta
For a Party:
- Create a build-your-own marinara bar with classic, spicy, and creamy options
- Offer different dipping sauces like pesto, alfredo, or garlic aioli
- Provide toothpicks or small skewers for easy handling
- Set up a station with various garnishes like microgreens, crushed red pepper, and different grated cheeses
Troubleshooting Common Issues
Even with the best preparation, things sometimes go awry. Here’s how to handle common problems:
Breading Falls Off:
Problem: The breading separates from the ravioli during frying. Solution: Make sure to pat the ravioli completely dry before starting the breading process. Also, press the breadcrumbs firmly onto the ravioli and let them rest for 5-10 minutes before frying to help the coating adhere.
Ravioli Burst During Frying:
Problem: The ravioli split open and the filling leaks out. Solution: Be gentle when handling the ravioli throughout the breading process. Also, make sure your oil isn’t too hot—maintain it at 350°F (175°C). Finally, don’t overcrowd the pan, as this can cause the ravioli to bump into each other.
Ravioli Not Crispy Enough:
Problem: The fried ravioli has a soggy texture. Solution: Make sure your oil is hot enough before adding the ravioli. Also, don’t overcrowd the pan, as this lowers the oil temperature. Finally, make sure you’re draining them properly on paper towels after frying.
Marinara Too Acidic:
Problem: The marinara sauce tastes too tangy or acidic. Solution: Add an extra teaspoon of sugar to balance the acidity, or stir in a tablespoon of butter at the end of cooking to mellow the flavors.
Healthier Alternatives
While traditional deep-fried ravioli is undeniably delicious, I’ve developed some lighter alternatives that still deliver on flavor:
Air Fryer Method:
- Preheat your air fryer to 350°F (175°C).
- Bread the ravioli as directed in the main recipe.
- Spray both sides of the breaded ravioli lightly with cooking spray.
- Place ravioli in a single layer in the air fryer basket (work in batches).
- Cook for 8-10 minutes, flipping halfway through, until golden and crispy.
Baked Version:
- Preheat oven to 425°F (220°C).
- Line a baking sheet with parchment paper and spray with cooking spray.
- Bread ravioli as directed in the main recipe.
- Place ravioli on the prepared baking sheet in a single layer.
- Spray the tops lightly with cooking spray.
- Bake for 15-20 minutes, flipping halfway through, until golden and crispy.
While these methods don’t achieve quite the same level of crispiness as deep-frying, they come surprisingly close while significantly reducing the oil content.
Questions & Answers
What type of ravioli works best for this recipe?
Fresh refrigerated cheese ravioli typically works best for this recipe, as it has the perfect texture and holds up well during frying. If you can only find frozen ravioli, make sure to thaw it completely and pat it very dry before beginning the breading process. As for fillings, while cheese is the classic choice, most fillings work well—just avoid any with very wet components.
Can I make these ahead of time for a party?
Absolutely! You have a few options: 1) Make the marinara up to 3 days ahead and store in the refrigerator; 2) Bread the ravioli up to 4 hours ahead and keep refrigerated; or 3) Par-fry the ravioli until just light golden, cool completely, refrigerate, then finish frying just before serving. For best results, I wouldn’t recommend fully frying them more than a few hours before serving, as they’re at their crispiest soon after frying.
What’s the best oil for frying ravioli?
I recommend using a neutral oil with a high smoke point. Vegetable oil, canola oil, or peanut oil all work well. Avoid olive oil for deep frying, as it has a lower smoke point and can impart a strong flavor.
How do I know when the oil is at the right temperature without a thermometer?
Without a thermometer, drop a small piece of bread or a few breadcrumbs into the oil. If it sizzles immediately and rises to the surface, but doesn’t burn quickly, your oil is around 350°F and ready. If it sinks and doesn’t sizzle much, the oil is too cold. If it browns within seconds, the oil is too hot.
My marinara is too chunky—how can I fix it?
If you prefer a smoother marinara, you have two options: 1) Use an immersion blender directly in the pot to blend to your desired consistency, or 2) Transfer the sauce in batches to a standard blender (be careful with the hot liquid—leave the center cap off and cover with a towel to allow steam to escape). For a partially smooth texture, blend only half the sauce and mix it back with the chunky portion.
Can I use store-bought marinara sauce to save time?
Absolutely! While homemade marinara does have a fresher flavor, a good quality store-bought marinara can be a great time-saver. To enhance store-bought sauce, try simmering it with some fresh garlic, a splash of good olive oil, and some torn fresh basil leaves for about 10 minutes.
What can I substitute for eggs in the breading process if I have an allergy?
For an egg-free version, you can substitute 2 tablespoons of cornstarch mixed with ¼ cup of water or milk. Another option is to use ¼ cup of plain yogurt or buttermilk. These alternatives help the breadcrumbs adhere, though the binding might not be quite as strong as with eggs.
Why did my ravioli open up during frying?
This typically happens if the ravioli had small tears before frying, the oil was too hot, or if the ravioli were moved too much in the early stages of frying. Make sure to inspect ravioli for tears before breading, maintain the oil at 350°F, and let the ravioli sit undisturbed for the first 30 seconds of frying before gently turning.
In Conclusion
Fried ravioli with marinara dipping sauce bridges the gap between comfort food and elegant appetizer. There’s something genuinely satisfying about transforming a simple pasta into something so crave-worthy. Whether you’re serving these at your next dinner party or enjoying them as a special family treat, I’m confident they’ll become a requested favorite.
I hope you’ve found all the details you need to create perfectly crispy fried ravioli with a delicious marinara dipping sauce. The combination of that satisfying crunch, the tender pasta, flavorful filling, and rich tomato sauce creates an irresistible appetizer that’s sure to impress.
Remember, cooking is all about experimenting and making recipes your own. Don’t be afraid to try different fillings, coatings, or dipping sauces to customize this dish to your taste preferences. If you give this recipe a try, I’d love to hear how it turned out and any creative twists you added to make it your own!