When autumn arrives and pumpkins start appearing on every corner, I find myself craving desserts that capture the essence of fall. This pumpkin cheesecake with marshmallow meringue has become my absolute favorite way to celebrate the season. The combination of creamy, spiced pumpkin filling nestled on a buttery graham cracker crust, topped with pillowy marshmallow meringue, creates a dessert that’s both elegant and comforting.
I’ve been perfecting this recipe for years, and what makes it special is the balance of flavors and textures. The rich pumpkin cheesecake base delivers all those warm spices we associate with fall, while the marshmallow meringue adds a delightful contrast with its sweet, cloud-like texture. It’s like having the best of both worlds – the sophistication of cheesecake meets the nostalgic charm of toasted marshmallows.
Understanding the Components
Before diving into the recipe, let me break down what makes this dessert so special:
Cheesecake Base : The foundation uses cream cheese, pumpkin puree, and a carefully selected blend of spices including cinnamon, nutmeg, ginger, and cloves. The key is achieving the perfect balance where the pumpkin flavor shines without being overwhelmed by spices.
Graham Cracker Crust : A classic buttery crust made with graham crackers, sugar, and melted butter. I add a pinch of cinnamon to complement the pumpkin flavors above.
Marshmallow Meringue : This isn’t your typical meringue. I incorporate marshmallow fluff or create a marshmallow-style meringue that’s more stable and has that distinctive marshmallow flavor.
Spice Blend : The magic happens in the spice combination. I use a ratio that enhances the pumpkin without creating muddy flavors.
Essential Ingredients and Their Roles
The success of this dessert depends on understanding how each ingredient contributes to the final result. Here’s what you’ll need and why each component matters:
| Ingredient | Quantity | Purpose | Tips |
|---|---|---|---|
| Cream Cheese | 32 oz (4 packages) | Creates the rich, creamy base | Must be room temperature for smooth mixing |
| Pumpkin Puree | 1 can (15 oz) | Provides flavor and color | Use pure pumpkin, not pumpkin pie filling |
| Large Eggs | 4 | Binding agent and structure | Room temperature prevents curdling |
| Granulated Sugar | 1 cup | Sweetens and helps texture | Don’t reduce or cheesecake won’t set |
| Vanilla Extract | 2 tsp | Enhances overall flavor | Use pure vanilla, not imitation |
| Ground Cinnamon | 1 tsp | Warm spice foundation | Freshly ground preferred |
| Ground Nutmeg | 1/2 tsp | Adds complexity | Use sparingly – can overpower |
| Ground Ginger | 1/2 tsp | Brings warmth and zing | Fresh grated works too |
| Ground Cloves | 1/4 tsp | Deepens spice profile | Very potent – measure carefully |
| Heavy Cream | 1/2 cup | Adds richness | Must be cold for best results |
For the Crust:
| Ingredient | Quantity | Purpose | Tips |
|---|---|---|---|
| Graham Crackers | 1 sleeve (9 crackers) | Crust base | Crush to fine crumbs |
| Melted Butter | 1/4 cup | Binds crust together | Cooled slightly |
| Sugar | 2 tbsp | Sweetens crust | Brown sugar works too |
| Cinnamon | 1/2 tsp | Complements filling | Optional but recommended |
For the Marshmallow Meringue:
| Ingredient | Quantity | Purpose | Tips |
|---|---|---|---|
| Egg Whites | 4 large | Meringue base | Room temperature whips better |
| Granulated Sugar | 1 cup | Sweetens and stabilizes | Add gradually |
| Cream of Tartar | 1/4 tsp | Stabilizes meringue | Essential for structure |
| Vanilla Extract | 1 tsp | Flavor enhancement | Add at end |
| Marshmallow Fluff | 1/2 cup | Marshmallow flavor | Alternative method |
Step-by-Step Preparation Process
Preparing the Crust
The crust is your foundation, so getting it right is crucial. I start by preheating my oven to 350°F and greasing a 9-inch springform pan thoroughly. The key to a perfect crust is achieving the right texture – not too fine that it becomes powdery, but not so coarse that it won’t hold together.
I crush my graham crackers in a food processor until they form fine crumbs. If you don’t have a food processor, placing them in a sealed bag and rolling with a rolling pin works just as well. The texture should resemble coarse sand. I then mix these crumbs with melted butter, sugar, and a touch of cinnamon until the mixture resembles wet sand and holds together when pressed.
Pressing the mixture into the bottom of my springform pan requires a gentle but firm touch. I use the bottom of a measuring cup to create an even layer, making sure to press the edges slightly up the sides. This creates a small lip that helps contain the filling. The crust then goes into the oven for 10 minutes to set before adding the filling.
Creating the Perfect Pumpkin Filling
The filling is where the magic happens, and temperature control is everything. I start with room-temperature cream cheese because cold cream cheese creates lumps that are nearly impossible to smooth out. I beat it until it’s completely smooth and fluffy, which takes about 3-4 minutes with an electric mixer.
Gradually, I add the sugar, beating until well combined. This is when I add my eggs one at a time, making sure each is fully incorporated before adding the next. This prevents the mixture from curdling and ensures a smooth texture. The pumpkin puree goes in next, followed by the vanilla and all my spices.
The spice blend is where personal preference comes into play, but I’ve found this combination creates the perfect fall flavor profile. The heavy cream is added last, and I beat just until combined. Overmixing at this stage can incorporate too much air, leading to cracks during baking.
Baking Techniques for Success
Baking cheesecake requires patience and the right technique. I pour the filling over my pre-baked crust and smooth the top with an offset spatula. To prevent cracks, I use a water bath method. I wrap the bottom of my springform pan in aluminum foil to prevent water from seeping in, then place it in a larger roasting pan.
I pour hot water into the roasting pan until it reaches halfway up the sides of the springform pan. This creates a gentle, humid environment that prevents the cheesecake from cracking. The initial baking temperature is 325°F for about 55-60 minutes, until the center is almost set but still slightly jiggly.
The cooling process is just as important as the baking. I turn off the oven and crack the door open, letting the cheesecake cool gradually for an hour. This prevents thermal shock that can cause cracks. After that, I remove it from the water bath and cool it completely at room temperature before refrigerating.
Mastering the Marshmallow Meringue
The marshmallow meringue is what sets this dessert apart from traditional pumpkin cheesecake. I have two methods I use depending on my mood and time constraints.
Method 1: Traditional Marshmallow Meringue
For this method, I start with room-temperature egg whites in a completely clean bowl. Any trace of fat or yolk will prevent proper whipping. I add cream of tartar and begin whipping on medium speed until soft peaks form. Gradually, I add sugar while continuing to whip until stiff, glossy peaks form.
The key is patience – this process takes about 8-10 minutes. I know it’s ready when I can hold the bowl upside down and the meringue doesn’t move. At this point, I fold in vanilla extract and a small amount of marshmallow fluff for that distinctive marshmallow flavor.
Method 2: Marshmallow Fluff Meringue
This quicker method involves whipping marshmallow fluff with a small amount of hot water to loosen it, then folding it into a basic meringue. It’s more forgiving and gives a more pronounced marshmallow flavor, though it’s slightly less stable than the traditional method.
Assembly and Finishing Touches
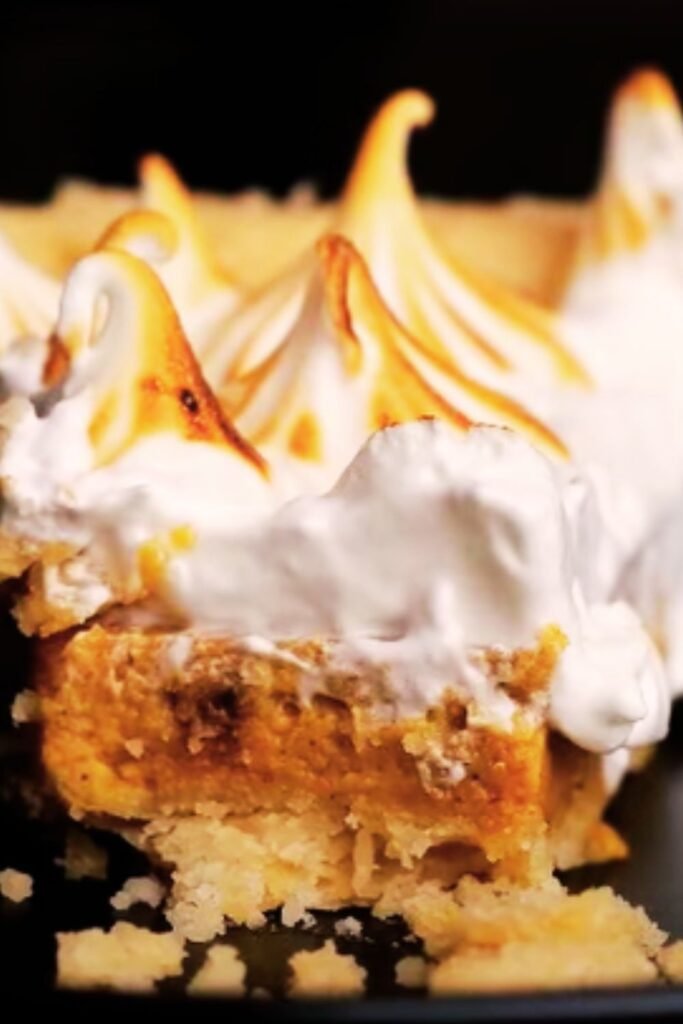
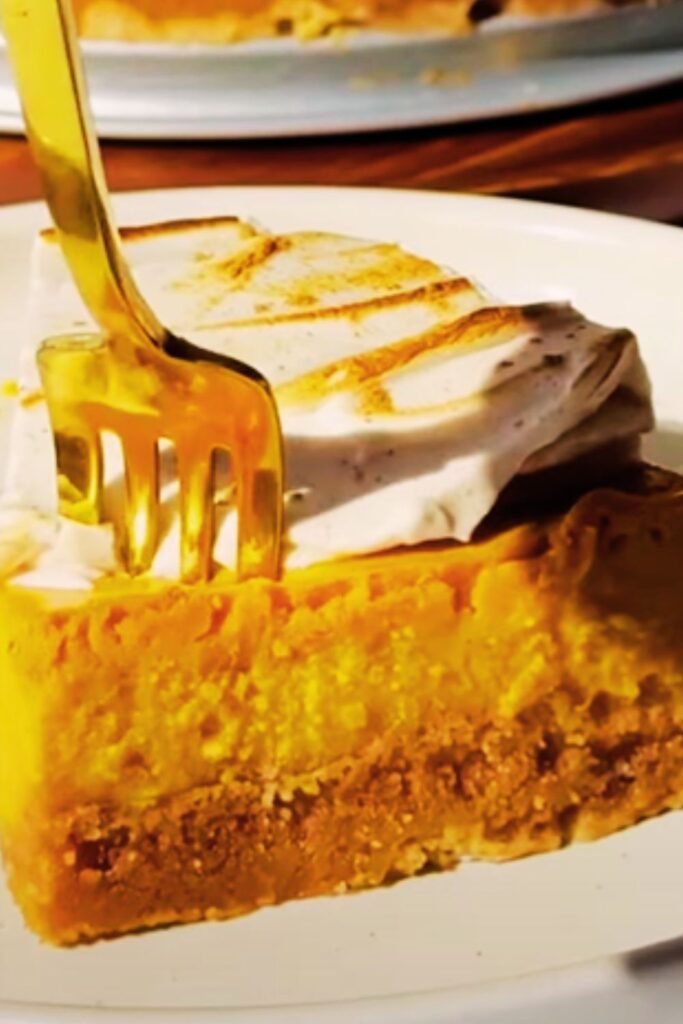
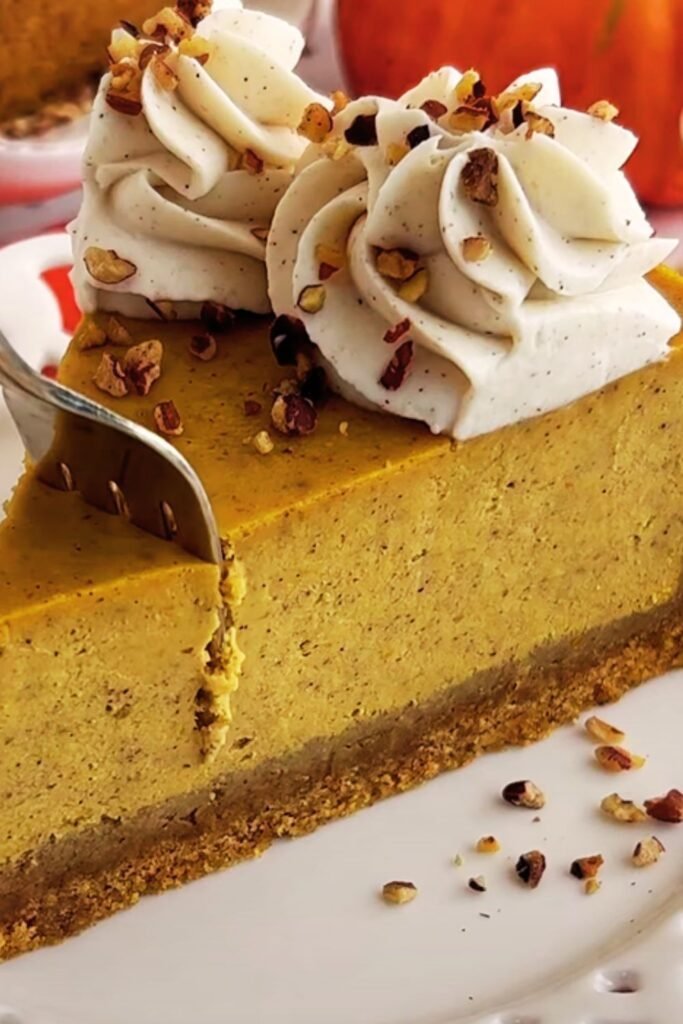
Once my cheesecake is completely chilled (I typically refrigerate it overnight), I’m ready to add the meringue topping. I remove the sides of the springform pan carefully, then pipe or spread the marshmallow meringue over the top using a large star tip for an elegant presentation.
For the finishing touch, I use a kitchen torch to lightly brown the meringue peaks, creating that toasted marshmallow effect. If you don’t have a torch, a quick stint under the broiler works, but watch carefully to prevent burning.
Nutritional Information and Serving Guidelines
Understanding the nutritional content helps with serving sizes and dietary considerations:
| Nutrient | Per Slice (1/12 of cake) | Daily Value % |
|---|---|---|
| Calories | 485 | 24% |
| Total Fat | 32g | 41% |
| Saturated Fat | 19g | 95% |
| Cholesterol | 165mg | 55% |
| Sodium | 385mg | 17% |
| Total Carbs | 42g | 15% |
| Dietary Fiber | 2g | 7% |
| Sugars | 38g | – |
| Protein | 9g | 18% |
| Vitamin A | 8,200 IU | 164% |
| Vitamin C | 3mg | 5% |
| Calcium | 150mg | 15% |
| Iron | 1.2mg | 7% |
Storage and Make-Ahead Tips
This cheesecake actually improves with time, making it perfect for advance preparation. I always make mine at least a day ahead to allow the flavors to meld and the texture to perfect itself. The cheesecake base can be stored in the refrigerator for up to 5 days, though I recommend adding the meringue topping no more than 4 hours before serving to maintain its texture.
For longer storage, the cheesecake (without meringue) freezes beautifully for up to 3 months. I wrap it tightly in plastic wrap and aluminum foil, then thaw it in the refrigerator overnight before adding the meringue and serving.
Troubleshooting Common Issues
Over the years, I’ve encountered and solved various issues with this recipe:
Cracked Cheesecake : Usually caused by temperature shock or overbaking. The water bath method and gradual cooling prevent this.
Lumpy Filling : Cold cream cheese is the culprit. Always bring ingredients to room temperature before mixing.
Deflated Meringue : Overbeaten egg whites or traces of fat in the bowl. Clean equipment and proper technique are essential.
Soggy Crust : Under-baked crust or not sealing the springform pan properly during the water bath.
Weeping Meringue : High humidity or not enough sugar. The meringue needs proper stabilization.
Seasonal Variations and Adaptations
While this recipe shines in fall, I’ve created several variations throughout the year:
Summer Berry Version : Replace pumpkin with mixed berry puree and adjust spices to vanilla and lemon zest.
Chocolate Variation : Add cocoa powder to the base and use chocolate graham crackers for the crust.
Maple Pecan : Incorporate maple syrup and chopped pecans for a different fall flavor profile.
Lighter Version : Use reduced-fat cream cheese and substitute some of the eggs with egg whites for a lighter texture.
Serving Suggestions and Pairings
This dessert is rich enough to stand alone, but I love pairing it with complementary flavors and textures. A drizzle of caramel sauce adds sweetness and visual appeal, while a sprinkle of toasted pecans provides textural contrast.
For beverages, I find that coffee-based drinks complement the spices beautifully. A rich espresso or spiced chai tea enhances the warm flavors without competing with them. Hot chocolate with a cinnamon stick creates a cozy, indulgent experience perfect for fall gatherings.
Fresh whipped cream on the side allows guests to customize their richness level, and a few fresh berries add a pop of color and tartness that cuts through the richness.
Special Occasion Presentations
This cheesecake works wonderfully for various celebrations. For Thanksgiving, I sometimes add a decorative border of mini marshmallows around the edge before torching, creating a campfire-inspired presentation. Halloween calls for orange and black decorations – perhaps some chocolate shavings and orange zest.
For more formal occasions, I create individual mini cheesecakes using a muffin tin, which allows for perfect portion control and elegant presentation. The same recipe works, just adjust the baking time to about 25-30 minutes.
Questions and Answers
Q: Can I make this cheesecake without the marshmallow meringue topping? A: Absolutely! The pumpkin cheesecake is delicious on its own. You could substitute with traditional whipped cream, caramel sauce, or even a simple dusting of cinnamon sugar.
Q: What’s the best way to prevent cracks in my cheesecake? A: The water bath method is crucial, along with not overbaking and allowing gradual cooling. Also, make sure all ingredients are at room temperature before mixing to prevent lumps that can cause cracks.
Q: Can I use fresh pumpkin instead of canned puree? A: Yes, but you’ll need to roast and puree the pumpkin first, then strain it to remove excess moisture. Fresh pumpkin can be more watery than canned, which might affect the texture.
Q: How do I know when the meringue is properly whipped? A: The meringue should hold stiff peaks when you lift the beaters, and the mixture should be glossy and smooth. You should be able to turn the bowl upside down without the meringue moving.
Q: Can I make this recipe gluten-free? A: Yes! Simply substitute the graham crackers with gluten-free graham crackers or use crushed gluten-free cookies for the crust. The filling is naturally gluten-free.
Q: Why did my meringue weep or become watery? A: This usually happens due to humidity, underbeaten egg whites, or not enough sugar. Make sure your bowl and beaters are completely clean and dry, and beat until proper peaks form.
Q: Can I freeze the finished cheesecake with meringue? A: I don’t recommend freezing with the meringue as it doesn’t thaw well. Freeze the cheesecake base only, then add fresh meringue after thawing.
Q: How can I tell if my cheesecake is done baking? A: The center should be almost set but still slightly jiggly when you gently shake the pan. It will continue to set as it cools. Overbaking leads to cracks and a dry texture.
Q: What’s the secret to smooth cream cheese mixing? A: Room temperature cream cheese is essential. Take it out of the refrigerator 2-3 hours before baking, or cut it into cubes and microwave for 15-20 seconds to soften quickly.
Q: Can I make mini versions of this cheesecake? A: Definitely! Use a muffin tin lined with paper liners, reduce baking time to 18-22 minutes, and adjust the crust and topping amounts accordingly. They’re perfect for parties and portion control.
This pumpkin cheesecake with marshmallow meringue has become my signature fall dessert, and I hope it becomes a favorite in your kitchen too. The combination of creamy spiced pumpkin filling with the sweet, fluffy meringue creates a dessert that’s both comforting and impressive. Whether you’re hosting Thanksgiving dinner or just want to celebrate the season, this recipe delivers every time. The key is patience, quality ingredients, and not being afraid to make it your own with personal touches and variations.