There’s something magical about the moment when rich chocolate meets creamy caramel in a perfectly crafted sandwich cookie. I’ve spent countless hours perfecting this recipe, and I can confidently say these caramel chocolate sandwich cookies represent the pinnacle of homemade indulgence. The contrast between the tender chocolate cookie shells and the luxurious caramel filling creates an experience that transcends ordinary desserts.
My journey with these cookies began during a particularly challenging winter when I craved something that would bring warmth and comfort to my kitchen. After numerous attempts and countless taste tests, I discovered the perfect balance of flavors and textures that makes these cookies absolutely irresistible. The secret lies not just in the ingredients, but in understanding how each component works together to create something extraordinary.
Understanding the Perfect Cookie Foundation
Chocolate Cookie Base: The foundation of exceptional sandwich cookies starts with understanding chocolate’s role in baking. I use a combination of cocoa powder and melted chocolate to achieve depth of flavor while maintaining the perfect texture.
Caramel Filling: Creating the ideal caramel requires patience and precision. The filling must be firm enough to hold its shape yet soft enough to bite through without cracking the cookie.
Texture Balance: The contrast between crispy edges and chewy centers creates the perfect bite every time.
Flavor Profile: Balancing sweetness with slight saltiness elevates these cookies from good to unforgettable.
Essential Ingredients and Their Roles
Understanding each ingredient’s purpose transforms good baking into exceptional results. Here’s my comprehensive breakdown of what makes these cookies special:
| Ingredient | Quantity | Purpose | Quality Tips |
|---|---|---|---|
| All-purpose flour | 2 cups | Provides structure and stability | Use unbleached for better flavor |
| Unsweetened cocoa powder | ¾ cup | Deep chocolate flavor and color | Dutch-processed works best |
| Dark chocolate (70%) | 4 oz | Rich chocolate taste and moisture | High-quality chocolate makes a difference |
| Unsalted butter | 1 cup | Texture, flavor, and richness | Room temperature for proper creaming |
| Granulated sugar | ¾ cup | Sweetness and structure | Fine granulation dissolves better |
| Brown sugar (packed) | ½ cup | Moisture and molasses flavor | Dark brown adds more depth |
| Large eggs | 2 | Binding and richness | Room temperature incorporates better |
| Vanilla extract | 2 tsp | Flavor enhancement | Pure vanilla, not imitation |
| Baking soda | 1 tsp | Leavening agent | Fresh for optimal rise |
| Salt | ½ tsp | Flavor balance | Fine sea salt preferred |
Caramel Filling Ingredients
| Ingredient | Quantity | Purpose | Quality Notes |
|---|---|---|---|
| Granulated sugar | 1 cup | Caramel base | Pure cane sugar caramelizes best |
| Heavy cream | ⅓ cup | Creamy texture | Room temperature prevents seizing |
| Unsalted butter | 4 tbsp | Richness and smoothness | European-style butter preferred |
| Vanilla extract | 1 tsp | Flavor enhancement | Add after removing from heat |
| Sea salt | ¼ tsp | Flavor balance | Flaky sea salt works beautifully |
| Powdered sugar | 1 cup | Thickening and sweetness | Sift to prevent lumps |
Step-by-Step Cookie Preparation
My method ensures consistent results every time. I’ve refined this process through years of baking, and each step serves a specific purpose in creating the perfect texture and flavor.
Preparing the Chocolate Cookies
I start by preheating my oven to 350°F (175°C) and lining baking sheets with parchment paper. This temperature provides the perfect balance for cookies that bake evenly without burning.
In a microwave-safe bowl, I melt the dark chocolate in 30-second intervals, stirring between each interval until smooth. This gentle melting prevents the chocolate from seizing and ensures a silky texture.
Using my stand mixer with the paddle attachment, I cream the room-temperature butter with both sugars for 3-4 minutes until light and fluffy. This step incorporates air, creating the perfect cookie texture. I then add eggs one at a time, ensuring each is fully incorporated before adding the next.
The melted chocolate goes in next, followed by vanilla extract. I mix these ingredients just until combined, being careful not to overmix, which can lead to tough cookies.
In a separate bowl, I whisk together flour, cocoa powder, baking soda, and salt. This dry mixture gets added to the wet ingredients in three additions, mixing just until the flour disappears. Overmixing at this stage develops too much gluten, resulting in dense cookies.
Using a cookie scoop, I portion the dough into 1.5-inch balls, placing them 2 inches apart on prepared baking sheets. I bake for 10-12 minutes, just until the edges are set. The centers might look slightly underdone, but they’ll continue cooking on the hot pan.
Mastering the Caramel Filling
Creating perfect caramel requires attention and patience, but the results are worth every moment. I’ve learned that watching the color change and having all ingredients ready makes this process much smoother.
I start by placing granulated sugar in a heavy-bottomed saucepan over medium heat. Without stirring, I let the sugar melt and caramelize, swirling the pan occasionally to ensure even cooking. The sugar will clump initially, then gradually melt into an amber liquid.
When the caramel reaches a deep amber color (about 10-12 minutes), I remove it from heat and immediately add room-temperature heavy cream while whisking constantly. The mixture will bubble vigorously, which is normal.
I return the pan to low heat and whisk in butter, one tablespoon at a time, until completely incorporated. The mixture should be smooth and glossy. I remove it from heat and stir in vanilla and sea salt.
To transform this into filling consistency, I gradually whisk in powdered sugar until the mixture holds its shape but remains spreadable. The consistency should be similar to thick frosting.
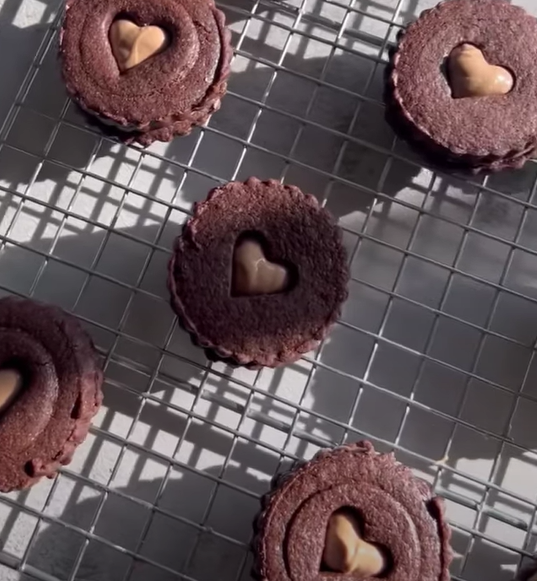
Assembly Techniques for Perfect Sandwiches
The assembly process requires timing and technique to achieve professional-looking results. I’ve found that proper cookie cooling and filling consistency are crucial for success.
Once my cookies have cooled completely, I sort them by size to create evenly matched pairs. This attention to detail ensures each sandwich cookie looks professional and bites evenly.
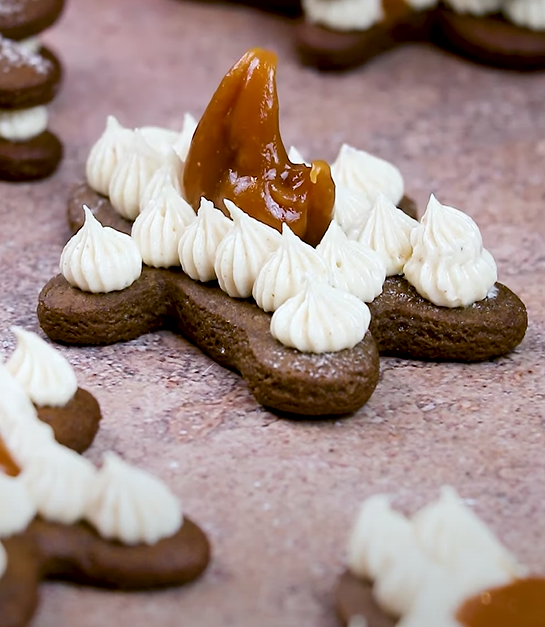
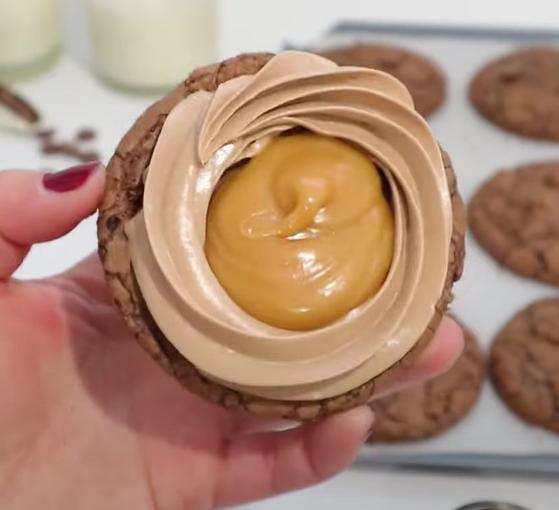
Using a piping bag or offset spatula, I apply approximately one tablespoon of caramel filling to the flat side of one cookie. I prefer using a piping bag with a round tip for consistent application and attractive presentation.
I gently press the second cookie on top, applying just enough pressure to spread the filling to the edges without squeezing it out. The filling should be visible around the perimeter, creating an appealing visual contrast.
For the cleanest presentation, I wipe any excess filling from the edges with a damp paper towel. This step makes the difference between homemade-looking and bakery-quality cookies.
Storage and Freshness Guidelines
Proper storage ensures these cookies maintain their perfect texture and flavor for days. I’ve tested various methods to determine the best approach for different timeframes.
| Storage Method | Duration | Container | Temperature | Notes |
|---|---|---|---|---|
| Room temperature | 3-5 days | Airtight container | 68-72°F | Best for immediate consumption |
| Refrigerator | 1 week | Sealed container | 35-40°F | Filling stays firm |
| Freezer (assembled) | 1 month | Freezer bags | 0°F | Thaw at room temperature |
| Freezer (components) | 3 months | Separate containers | 0°F | Assemble after thawing |
I recommend storing assembled cookies in a single layer when possible, separating layers with parchment paper to prevent sticking. The caramel filling can soften at room temperature, so refrigeration helps maintain structure during warm weather.
Troubleshooting Common Issues
Through years of making these cookies, I’ve encountered and solved numerous challenges. Here are the most common issues and my proven solutions:
Cookies spreading too much: This usually indicates butter that’s too warm or insufficient flour. I ensure my butter is at proper room temperature (65-68°F) and measure flour accurately.
Caramel too soft: Under-caramelized sugar or too much cream can cause this. I cook the sugar to a deeper amber color and add powdered sugar gradually until proper consistency is achieved.
Cookies cracking: Overbaking or too much leavening agent causes cracking. I remove cookies when edges are just set and centers look slightly underdone.
Filling oozing out: This happens when cookies are too warm during assembly or filling is too soft. I ensure complete cooling and adjust filling consistency with additional powdered sugar if needed.
Variation Ideas and Flavor Combinations
My basic recipe serves as a foundation for countless variations. I’ve experimented with numerous flavor combinations, and these are my favorites:
Salted Caramel Version: I increase the sea salt in the filling to ½ teaspoon and sprinkle flaky sea salt on top of each assembled cookie.
Espresso Enhancement: Adding 1 tablespoon of instant espresso powder to the cookie dough creates a sophisticated mocha flavor that pairs beautifully with caramel.
Spiced Variation: A pinch of cinnamon and nutmeg in both the cookies and filling adds warmth and complexity.
Nutty Addition: Chopped toasted pecans or hazelnuts folded into the caramel filling provide delightful texture contrast.
Nutritional Information and Dietary Considerations
Understanding the nutritional content helps with portion planning and dietary accommodations. Here’s the breakdown per cookie (makes approximately 24 sandwich cookies):
| Nutrient | Per Cookie | Daily Value % |
|---|---|---|
| Calories | 285 | 14% |
| Total Fat | 12g | 15% |
| Saturated Fat | 7g | 35% |
| Cholesterol | 35mg | 12% |
| Sodium | 125mg | 5% |
| Total Carbohydrates | 45g | 16% |
| Dietary Fiber | 3g | 11% |
| Sugars | 35g | – |
| Protein | 4g | 8% |
For those with dietary restrictions, I’ve successfully adapted this recipe using gluten-free flour blends and dairy-free alternatives, though texture and flavor may vary slightly.
Serving Suggestions and Presentation Ideas
These cookies shine in various serving contexts. I’ve found they’re equally at home at casual family gatherings and elegant dinner parties.
For special occasions, I arrange them on tiered serving stands with seasonal decorations. During holidays, a light dusting of powdered sugar creates a snow-like effect that’s particularly appealing.
Pairing these cookies with coffee, tea, or hot chocolate creates a perfect afternoon treat. The rich flavors complement both robust coffee and delicate teas beautifully.
For children’s parties, I sometimes add colorful sprinkles to the filling before assembly, creating a fun surprise when bitten into.
Frequently Asked Questions
Q: Can I make the cookies ahead of time? I absolutely recommend making components ahead. The cookies can be baked and stored unfilled for up to a week, while the caramel filling keeps well in the refrigerator for the same duration. I actually prefer assembling them the day I plan to serve them for optimal texture.
Q: Why did my caramel seize when I added the cream? This happens when the temperature difference between the caramel and cream is too great. I always ensure my cream is at room temperature and add it gradually while whisking constantly. If seizing occurs, I continue whisking over low heat until smooth.
Q: Can I substitute the cocoa powder with chocolate chips? While possible, this substitution significantly changes the texture and flavor intensity. I recommend sticking with cocoa powder for the authentic deep chocolate flavor and proper cookie structure.
Q: How do I know when the caramel is the right color? The perfect caramel color resembles dark amber or old honey. I look for a deep golden-brown that’s darker than typical butterscotch but not so dark it approaches burnt. The aroma should be nutty and sweet, not acrid.
Q: Can I freeze the assembled cookies? Yes, assembled cookies freeze beautifully for up to one month. I place them in a single layer in freezer-safe containers and thaw them at room temperature for about 30 minutes before serving.
Q: What’s the best way to achieve uniform cookie sizes? I use a 1.5-inch cookie scoop for consistent portioning. This tool ensures each cookie is the same size, leading to even baking and professional appearance.
Q: Why are my cookies too soft or too hard? Texture issues usually relate to baking time and temperature. Soft cookies indicate underbaking, while hard cookies suggest overbaking. I remove cookies when edges are set but centers still look slightly underdone.
Q: Can I add alcohol to the caramel filling? A tablespoon of rum, bourbon, or Grand Marnier can be added to the cooled caramel for adult versions. I add it along with the vanilla extract for best integration.
Q: How do I prevent the filling from making the cookies soggy? Proper cooling is essential. I ensure cookies are completely cool before assembly and store assembled cookies properly. The filling should be thick enough to hold its shape without being absorbed into the cookies.
Q: What’s the secret to getting the caramel filling to the right consistency? The key is gradually adding powdered sugar to cooled caramel until it holds its shape but remains spreadable. I aim for a consistency similar to thick buttercream frosting.